


Arduino语音模块-Audio Shield for DFRduino M0
简介
- Audio Shield for DFRduino M0 是一款标准IIS接口的音频模块,采用WM8978 HiFi级codec芯片,具备单声道录音,双声道放音,SD卡存储,板载 SPI flash 存储,双声道3W功放。
- 搭配DFRobot M0系列开发板,能够让客户自由掌控各种音频功能,相对使用串口音频模块,能够让客户有更灵活的控制。
产品参数
- 工作电压:5V
- 工作电流:2A
- 标准shield接口
- 输入接口:linein & mic
- 输出接口:lineout & speaker
- 尺寸 55mm*53mm
- 重量 很轻
引脚说明
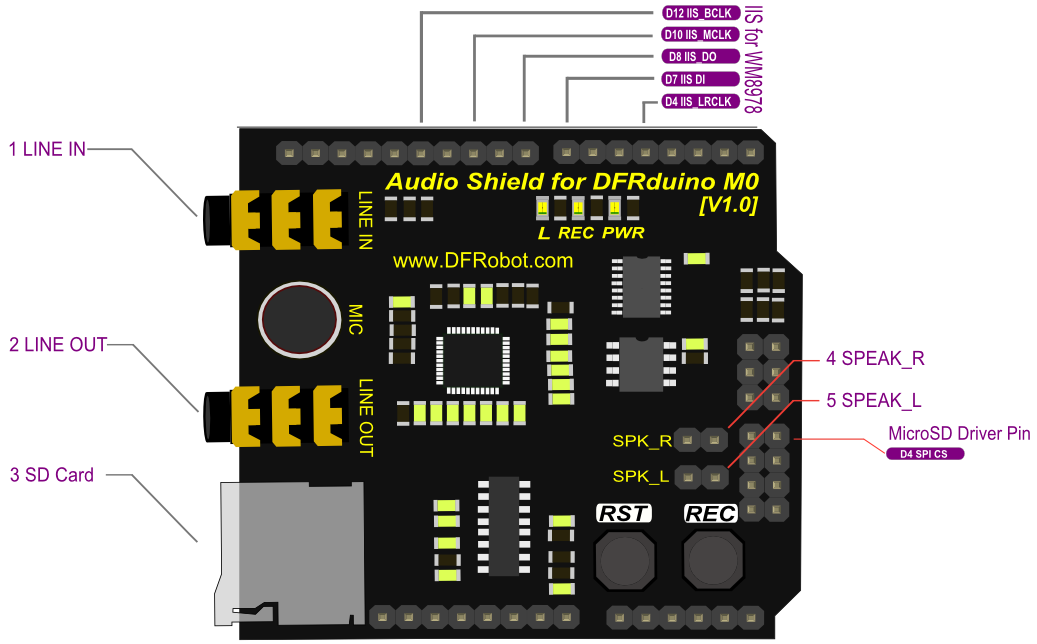
| 标号 | 名称 | 功能描述 |
| 1 | linein | linein |
| 2 | lineout | lineout |
| 3 | sdcard | sd卡插槽 |
| 4 | SPEAK_L | 左声道功放输出 |
| 5 | SPEAK_R | 右声道功放输出 |
| 6 |
使用教程
wav音频播放
所需硬件
- DFRduino M0 Mainboard x1
- Audio Shield for DFRduino M0 x1
- 3.5mm接口耳机或者3W喇叭
- 已经格式化为FAT格式的SD卡一张(当前不支持exFAT,请使用FAT16或者FAT32进行格式化)
所需软件
- Arduino IDE 版本1.6.6及以上版本 点击下载Arduino IDE
样例代码
点击下载库文件[下载链接]
#include <SPI.h>
#include <Wire.h>
#include <SD.h>
#include <WAV.h>

// set up variables using the SD utility library functions:
Sd2Card card;

///< assign sd card chipselect pin
const int chipSelect = 30;
void setup()
{
    // Open serial communications and wait for port to open:
    Serial.begin(115200);
    while (!Serial) {
      ; // wait for serial port to connect. Needed for Leonardo only
    }

    while(1){
        Serial.print("\nInitializing SD card...");

        // we'll use the initialization code from the utility libraries
        // since we're just testing if the card is working!
        if (!card.init(SPI_HALF_SPEED, chipSelect)) {
            Serial.println("initialization failed. Things to check:");
            Serial.println("* is a card inserted?");
            Serial.println("* is your wiring correct?");
            Serial.println("* did you change the chipSelect pin to match your shield or module?");
            delay(2000);
            continue;
        } else {
            Serial.println("Wiring is correct and a card is present.");
            if (!SD.begin(chipSelect)) {
                Serial.println("Card failed, or not present");
                delay(2000);
                continue;
            }
            break;
        }
    }
}

void loop()
{
    int ret;
    //assign music file and trigger transport dma
    wav.play("test.wav");
    do{
        //We must continue to decode to provide data to the player
        ret = wav.decode();
       //user code

    }while(ret == WAV_DECODING);

    while(1);
}
结果
打开串口,看到播放信息,之后耳机播放出声音。
wav音频录制
所需硬件
- DFRduino M0 Mainboard x1
- Audio Shield for DFRduino M0 x1
- 3.5mm接口耳机
- 已经格式化为FAT格式的SD卡一张(当前不支持exFAT,请使用FAT16或者FAT32进行格式化)
所需软件
- Arduino IDE 版本1.6.6及以上版本 点击下载Arduino IDE
样例代码
点击下载库文件[下载链接]
#include <SPI.h>
#include <Wire.h>
#include <SD.h>
#include <WAV.h>

// set up variables using the SD utility library functions:
Sd2Card card;

const int chipSelect = 30;  ///< assign sd card chipselect pin

void setup()
{
    // Open serial communications and wait for port to open:
    Serial.begin(115200);
    while (!Serial) {
        ; // wait for serial port to connect. Needed for Leonardo only
    }

    while(1){
        Serial.print("\nInitializing SD card...");

        // we'll use the initialization code from the utility libraries
        // since we're just testing if the card is working!
        if (!card.init(SPI_HALF_SPEED, chipSelect)) {
            Serial.println("initialization failed. Things to check:");
            Serial.println("* is a card inserted?");
            Serial.println("* is your wiring correct?");
            Serial.println("* did you change the chipSelect pin to match your shield or module?");
            delay(2000);
            continue;
        } else {
            Serial.println("Wiring is correct and a card is present.");
            if (!SD.begin(chipSelect)) {
                Serial.println("Card failed, or not present");
                delay(2000);
                continue;
            }
            break;
        }
    }
}

void loop()
{
    int ret;
    ret = wav.record("rec.wav");
    unsigned int start = millis();
    while(ret == WAV_ENCODING){
        ret = wav.encode();
        if(millis() - start > 5000){
            wav.stop();
            ret = WAV_ENCODE_END;
        }
    };
    while(1);
}
结果
打开串口,看到播放信息,之后耳机播放出声音。
本文整理于DFRobot wiki
获取最新文章: 扫一扫右上角的二维码加入“创客智造”公众号