Arduino库教程-Bridge-Temperature Web Panel
温度网页平台
这个例子示范了怎样通过yun设备内置互联网服务器的Bridge库来传输来自模拟输入引脚的数据。
准备你的SD卡和USB闪存,在根目录创建一个名为 "arduino"的空文件夹,和一个名为“www”的子文件夹 。确保yun设备创建一个到内存的路径"/mnt/sd" 的链接。
在这个程序里,文件是一个基本网页和zepto.js(最小版本的jQuery)的一个复制品。当你上传程序时,这些文件被放在可移动内存的/arduino/www/TemperatureWebPanel 的文件夹里。
你可以转到http://arduino.local/sd/TemperatureWebPanel来看这个程序的输出。
当Linux和程序正在运行时,你可以移动SD卡和USB闪存。但是系统正在写入时要小心移动。
硬件要求
- Yún 开发板或者 shield
- 电脑和yun设备应该在同样的无线或有线的网络里
- 在模拟引脚A1上的TMP36 温度传感器
- SD卡或者USB闪存
- 连接线
- 面包板
电路
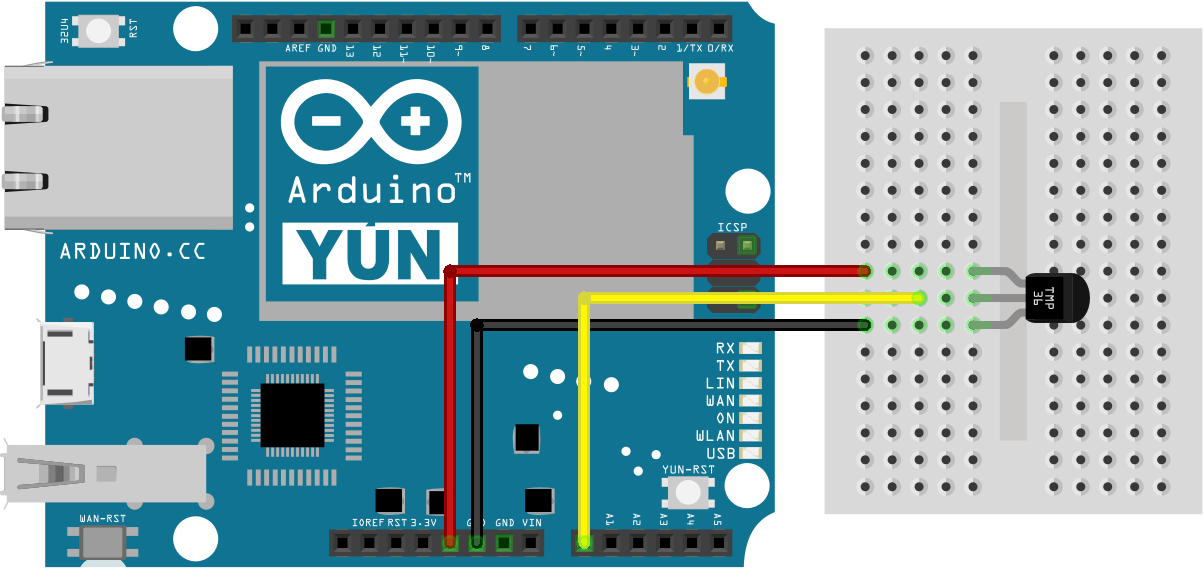
- 连接TMP36温度传感器到A1上,并且插入一个迷你SD卡到yun设备插槽或者shield的USB位置。

图由 Fritzing 软件绘制
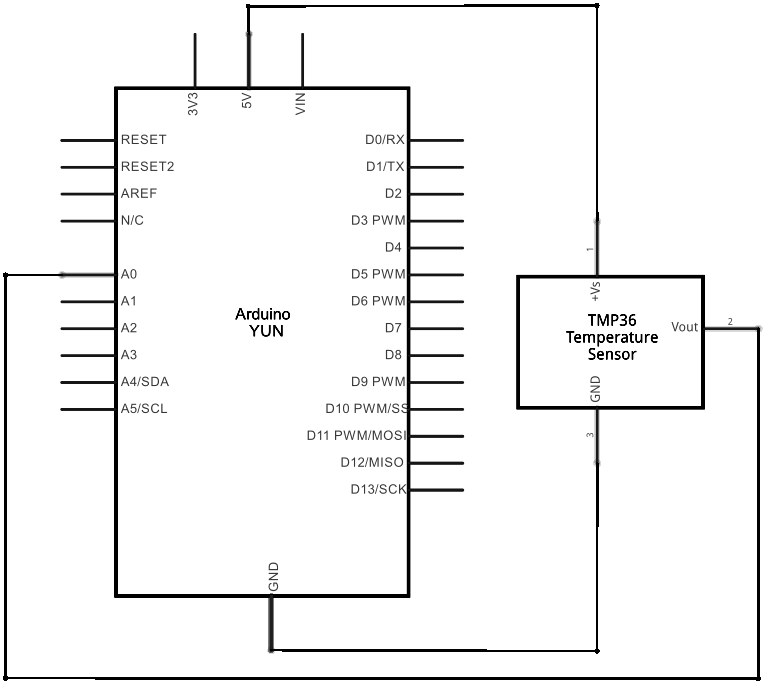
原理图

图由 Fritzing 软件绘制
样例代码
- 你需要包含Bridge, YunServer, 和 YunClient 的库文件 :
#include <Bridge.h>
#include <YunServer.h>
#include <YunClient.h>
- 例示一个服务器使能yun设备来等待连接好的客户端。
YunServer server;
- 创建一个字符串来保存程序开始的时间,和保存网页被浏览的痕迹次数的参数。
String startString;
long hits = 0;
- 在setup()里,开始串口通讯和Bridge。把内置LED灯作为一个知道Bridge开始的状态灯会很有帮助。
void setup() {
  Serial.begin(9600);

  pinMode(13,OUTPUT);
  digitalWrite(13, LOW);
  Bridge.begin();
  digitalWrite(13, HIGH);
- 设置A0和A2作为TMP36传感器的电源和地(这个可以节省一个面包板)
pinMode(A0, OUTPUT);
  pinMode(A2, OUTPUT);
  digitalWrite(A0, HIGH);
  digitalWrite(A2, LOW);
- 告诉服务器等待只从本地主机输入的连接,并且启动它
server.listenOnLocalhost();
  server.begin();
- 创建一个Process的例子来获得程序开始(运行数据命令和保存其到更早之前创建的字符串)的时间。
Process startTime;
  startTime.runShellCommand("date");
  while(startTime.available()) {
    char c = startTime.read();
    startString += c;
  }
}
- 在loop(),创建一个命名好的yun设备例子来获得所有从服务器传来的客户端
YunClient client = server.accept();
- 如果有一个新的客户端被连接,读取客户端发送的命令并且打印出来。
if (client) {
    String command = client.readString();
    command.trim();        //kill whitespace
    Serial.println(command);
- 如果这个命令是"temperature",获得当前时间并且读取温度传感器的值。
if (command == "temperature") {
      Process time;
      time.runShellCommand("date");
      String timeString = "";
      while(time.available()) {
        char c = time.read();
        timeString += c;
      }
      Serial.println(timeString);
      int sensorValue = analogRead(A1);
- 转化传感器读取值到温度摄氏度:
// convert the reading to millivolts:
      float voltage = sensorValue *  (5000/ 1024);
      // convert the millivolts to temperature celsius:
      float temperature = (voltage - 500)/10;
- 打印当前时间,温度,记录程序开始的时间和从用client.print()连接好的客服端开始hits算法的次数。
client.print("Current time on the Yun: ");
      client.println(timeString);
      client.print("<br>Current temperature: ");
      client.print(temperature);
      client.print(" degrees C");
      client.print("<br>This sketch has been running since ");
      client.print(startString);
      client.print("<br>Hits so far: ");
      client.print(hits);
    }
- 关闭连接来释放所有未使用的资源,并且增加hit次数。
client.stop();
    hits++;
  }
- 在新一轮开始之前暂停一段时间
delay(50); // Poll every 50ms
}
[Get Code]
- 完整代码如下:
/*
Temperature web interface
This example shows how to serve data from an analog input
via the Yún101/YunShield/Yún built-in webserver using the Bridge library.
The circuit:
* TMP36 temperature sensor on analog pin A1
* SD card attached to SD card slot of the Yún101/YunShield/Yún
This sketch must be uploaded via wifi. REST API must be set to "open".
Prepare your SD card with an empty folder in the SD root
named "arduino" and a subfolder of that named "www".
This will ensure that the Yún will create a link
to the SD to the "/mnt/sd" path.
In this sketch folder is a basic webpage and a copy of zepto.js, a
minimized version of jQuery. When you upload your sketch, these files
will be placed in the /arduino/www/TemperatureWebPanel folder on your SD card.
You can then go to http://arduino.local/sd/TemperatureWebPanel
to see the output of this sketch.
You can remove the SD card while the Linux and the
sketch are running but be careful not to remove it while
the system is writing to it.
created 6 July 2013
by Tom Igoe
This example code is in the public domain.
http://www.arduino.cc/en/Tutorial/TemperatureWebPanel
*/
#include <Bridge.h>
#include <BridgeServer.h>
#include <BridgeClient.h>
// Listen on default port 5555, the webserver on the Yún
// will forward there all the HTTP requests for us.
BridgeServer server;
String startString;
long hits = 0;
void setup() {
SerialUSB.begin(9600);
// Bridge startup
pinMode(13, OUTPUT);
digitalWrite(13, LOW);
Bridge.begin();
digitalWrite(13, HIGH);
// using A0 and A2 as vcc and gnd for the TMP36 sensor:
pinMode(A0, OUTPUT);
pinMode(A2, OUTPUT);
digitalWrite(A0, HIGH);
digitalWrite(A2, LOW);
// Listen for incoming connection only from localhost
// (no one from the external network could connect)
server.listenOnLocalhost();
server.begin();
// get the time that this sketch started:
Process startTime;
startTime.runShellCommand("date");
while (startTime.available()) {
char c = startTime.read();
startString += c;
}
}
void loop() {
// Get clients coming from server
BridgeClient client = server.accept();
// There is a new client?
if (client) {
// read the command
String command = client.readString();
command.trim(); //kill whitespace
SerialUSB.println(command);
// is "temperature" command?
if (command == "temperature") {
// get the time from the server:
Process time;
time.runShellCommand("date");
String timeString = "";
while (time.available()) {
char c = time.read();
timeString += c;
}
SerialUSB.println(timeString);
int sensorValue = analogRead(A1);
// convert the reading to millivolts:
float voltage = sensorValue * (5000.0f / 1024.0f);
// convert the millivolts to temperature celsius:
float temperature = (voltage - 500.0f) / 10.0f;
// print the temperature:
client.print("Current time on the Yún: ");
client.println(timeString);
client.print("<br>Current temperature: ");
client.print(temperature);
client.print(" °C");
client.print("<br>This sketch has been running since ");
client.print(startString);
client.print("<br>Hits so far: ");
client.print(hits);
}
// Close connection and free resources.
client.stop();
hits++;
}
delay(50); // Poll every 50ms
}
[Get Code]
更多
- Bridge: 从网页浏览器进入开发板的引脚。
- Console ASCII Table: 示范了怎样打印多种格式到控制台。
- Console Pixel: 通过控制台控制一个LED灯。
- Console Read: 从控制台那里分析信息,然后重复发送返回。
- Datalogger: 在SD卡上保存传感器信息。
- File Write Script: 示范怎样在Process上写入和执行外壳脚本。
- HTTP Client: 建造一个简单的客户端,可以下载网页并且打印到串口监视器。
- HTTP Client Console: 建造一个简单的客户端,可以下载网页并且用控制台通过WIFI打印到串口监视器。
- Mailbox Read Messages: 用REST API通过一个网页发送文本信息到。
- Process: 示范怎么用Process运行 Linux 命令。
- Remote Due Blink: 示范怎么远程上传程序到DUE开发板上。
- Shell Commands: 用Process 来运行 shell 命令。
- SpacebrewYun: 在Arduino IDE软件的例子上看更多关于 Spacebrew 文档信息。
- Temboo: 在Arduino IDE软件的例子上看更多关于 Temboo 文档信息。
- Temperature Web Panel: 当浏览者要求时,粘贴传感数据到网页上。
- Time Check: 从网络的时间服务器获得时间,并且打印到串口监视器。
- WiFi Status: 运行一个预配置的脚本,报告返回当前wifi网络的强度。
- Yun First Config: 用串口监视器不费力地连接你的云产品到wifi网络,并且在上面回答一些简单的问题。
- Yun Serial Terminal: 通过串口监视器进入Linux终端。
获取最新文章: 扫一扫右上角的二维码加入“创客智造”公众号


