


Dashgo底盘入门教程-应用-使用gmaping建图
Dashgo底盘入门教程-应用-使用gmaping建图
说明:
- 介绍如何实现gmaping建图
提示:
- 本教程使用 Flash Lidar F4 激光雷达 + D1 + Dashgo 进行 gmapping 建地图
- 树莓派的IP假设为192.168.11.100
- 运行环境:Ubuntu 14.04 、 indigo版ROS、树莓派3
gmaping建图:
- 正常启动并让树莓派与PC正常通讯
- 树莓派修改/etc/hosts文件,让树莓派知道PC端的IP与主机名
$ ssh pi@192.168.11.100
$ sudo vim /etc/hosts
- 内容如下:
127.0.0.1   localhost
127.0.1.1   dahsgo-d1-060
172.20.105.96 eaibot  #添加这行信息

# The following lines are desirable for IPv6 capable hosts
::1     ip6-localhost ip6-loopback
fe00::0 ip6-localnet
ff00::0 ip6-mcastprefix
ff02::1 ip6-allnodes
ff02::2 ip6-allrouters
- 树莓派运行扫地图主程序
$ roslaunch dashgo_nav gmapping_demo.launch
- 运行成功,如下面显示:
pi@dashgo-d1-web:~/dashgo_ws/src/dashgo/dashgo_nav/launch $ roslaunch dashgo_nav gmapping_demo.launch
... logging to /home/pi/.ros/log/a05f59f0-a569-11e6-9a1a-b827eb8dfc88/roslaunch-dashgo-d1-web-10624.log
Checking log directory for disk usage. This may take awhile.
Press Ctrl-C to interrupt
Done checking log file disk usage. Usage is <1GB.

started roslaunch server http://dashgo-d1-web:38957/

SUMMARY
========

CLEAR PARAMETERS
* /move_base/

PARAMETERS
* /arduino/Kd: 20
........
[ INFO] [1478578384.240421241]: Using plugin "static_layer"
[ INFO] [1478578384.442934859]: Requesting the map...
[INFO] [WallTime: 1478578384.575114] Attempting to connect to mongodb @ localhost:27017
[ INFO] [1478578384.664973875]: Resizing costmap to 544 X 544 at 0.050000 m/pix
[ INFO] [1478578384.764004366]: Received a 544 X 544 map at 0.050000 m/pix
[ INFO] [1478578384.790346896]: Using plugin "obstacle_layer"
[ INFO] [1478578384.804262619]: Subscribed to Topics: scan
[ INFO] [1478578384.949661094]: Using plugin "inflation_layer"
[ INFO] [1478578385.456495715]: Loading from pre-hydro parameter style
[ INFO] [1478578385.578284076]: Using plugin "obstacle_layer"
[ INFO] [1478578385.737670722]: Subscribed to Topics: scan
[ INFO] [1478578385.875052630]: Using plugin "inflation_layer"
[INFO] [WallTime: 1478578386.580523] Attempting to connect to mongodb @ localhost:27017
[ INFO] [1478578386.677315640]: Created local_planner teb_local_planner/TebLocalPlannerROS
[ WARN] [1478578387.057302959]: TebLocalPlannerROS() Param Warning: max_vel_x_backwards <= penalty_epsilon. The resulting bound is negative. Undefined behavior... Change at least one of them!
[ WARN] [1478578387.087761403]: TebLocalPlannerROS() Param Warning: 'alternative_time_cost' is deprecated. It has been replaced by 'selection_alternative_time_cost'.
[ INFO] [1478578387.114672479]: No robot footprint model specified for trajectory optimization. Using point-shaped model.
[ INFO] [1478578387.118526568]: Parallel planning in distinctive topologies disabled.
[ INFO] [1478578387.119119749]: No costmap conversion plugin specified. All occupied costmap cells are treaten as point obstacles.
[ WARN] [1478578387.597289377]: TebLocalPlannerROS() Param Warning: max_vel_x_backwards <= penalty_epsilon. The resulting bound is negative. Undefined behavior... Change at least one of them!
[INFO] [WallTime: 1478578388.584415] Attempting to connect to mongodb @ localhost:27017
[ INFO] [1478578389.330330106]: Recovery behavior will clear layer obstacles
[ INFO] [1478578389.543029629]: Recovery behavior will clear layer obstacles
[ INFO] [1478578389.781773815]: odom received!
若运行过程中,出现红色信息,说明运行出错了,可根据错误提示来寻找原因。
一般原因为下位机arduino连接不上,arduino固件受损,激光雷达连接不上,激光雷达内部出错等等。
PC端修改/etc/hosts文件,让PC端知道树莓派的IP与主机名
新打开一个终端
$ sudo vim /etc/hosts
- 内容如下:
127.0.0.1   localhost
127.0.1.1   eaibot
192.168.11.100 dahsgo-d1   #添加这行信息

# The following lines are desirable for IPv6 capable hosts
::1     ip6-localhost ip6-loopback
fe00::0 ip6-localnet
ff00::0 ip6-mcastprefix
ff02::1 ip6-allnodes
ff02::2 ip6-allrouters
- 注意:若没有设置/etc/hosts文件,两端数据难以通信的。
- PC端运行图形界面
$ export ROS_MASTER_URI=http://192.168.11.100:11311
$ roslaunch turtlebot_rviz_launchers view_navigation.launch
- 注意:ROS_MASTER_URI的IP要根据实际情况来定。
- 前面launch文件正常启动的情况下,打开的rviz只 D1 控件并没有其他信息显示的情况下,可能是激光雷达没有正常启动。
- 判断激光雷达是否正常启动,主要看launch文件的启动信息有没有出现 Flash Lidar health status : 0 ,有这行信息则正常。
setting /run_id to a05f59f0-a569-11e6-9a1a-b827eb8dfc88
process[rosout-1]: started with pid [10653]
started core service [/rosout]
process[arduino-2]: started with pid [10671]
process[flashgo-3]: started with pid [10672]
process[robot_state_publisher-4]: started with pid [10673]
process[joint_state_publisher-5]: started with pid [10685]
Flash Lidar health status : 0
process[base_link_to_laser4-6]: started with pid [10707]
process[slam_gmapping-7]: started with pid [10720]
process[move_base-8]: started with pid [10732]
process[world_canvas_server-9]: started with pid [10758]
process[robot_pose_publisher-10]: started with pid [10768]
process[twist_marker_server-11]: started with pid [10780]
process[rosbridge_websocket-12]: started with pid [10799]
- 注意:在建图前要先对激光雷达 F4 与 D1 的坐标进行对齐,请看 激光雷达F4与D1的坐标校正 这章节。
控制 D1 移动扫描地图
键盘控制
- 激光雷达 F4 与 D1 的坐标对齐后,Ctrl + Alt + T 打开新的终端,运行命令
$ ssh pi@192.168.11.100
$ rosrun dashgo_bringup teleop_twist_keyboard.py
- 得到如下内容
Reading from the keyboard and Publishing to Twist!
---------------------------
Moving around:
u i o
j k l
m , .

q/z : increase/decrease max speeds by 10%
w/x : increase/decrease only linear speed by 10%
e/c : increase/decrease only angular speed by 10%
anything else : stop

CTRL-C to quit
- 控制 D1 移动的按键分布如下:
前进: i
后退: ,
左转: j
后转: l
停止: k
- 注意:键盘控制移动的速度较大,注意人物安全。
手机控制
- 通过 EAI 团队开发的手机 APP 控制,目前仅支持 Android。
- 在 APP 启动界面,选择 “WIFI” 便进入到WiFi连接界面,如下图所示:
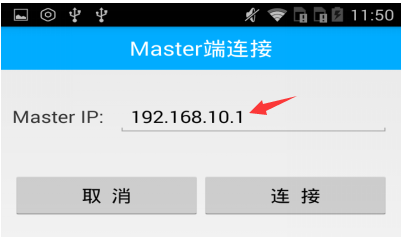
需要输入的 Master IP 是 PC 的 IP 地址。
树莓派查看 IP 地址,Ctrl + Alt + T 打开终端,ssh登录树莓派,输入 ifconfig ,然后回车
eaibot@eaibot:~$ ssh pi@192.168.11.100
pi@eaibot:~$ ifconfig
eth0 Link encap:以太网 硬件地址 44:37:e6:3d:e0:fc
inet 地址:192.168.11.100 广播:192.168.11.255 掩码:255.255.255.0 //有线网络的IP地址
inet6 地址: fe80::4637:e6ff:fe3d:e0fc/64 Scope:Link
UP BROADCAST RUNNING MULTICAST MTU:1500 跃点数:1
接收数据包:350 错误:0 丢弃:0 过载:0 帧数:0
发送数据包:134 错误:0 丢弃:0 过载:0 载波:0
碰撞:0 发送队列长度:1000
接收字节:27790 (27.7 KB) 发送字节:18843 (18.8 KB)
中断:17

lo Link encap:本地环回
inet 地址:127.0.0.1 掩码:255.0.0.0 //本地的IP地址
inet6 地址: ::1/128 Scope:Host
UP LOOPBACK RUNNING MTU:65536 跃点数:1
接收数据包:167 错误:0 丢弃:0 过载:0 帧数:0
发送数据包:167 错误:0 丢弃:0 过载:0 载波:0
碰撞:0 发送队列长度:1
接收字节:12903 (12.9 KB) 发送字节:12903 (12.9 KB)
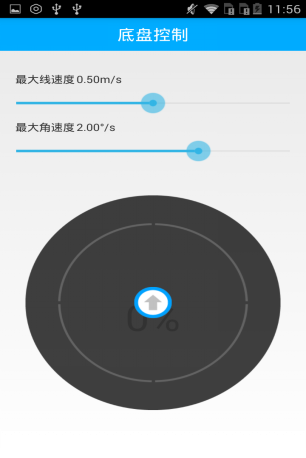
- 连接成功后,界面如下:
- 方向的操控,如下图所示:
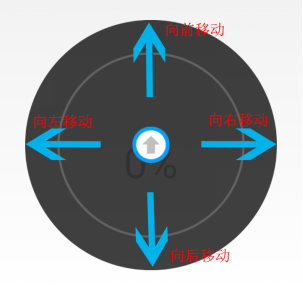
注意:
1、ROS 系统的 IP 必须与手机端的 IP 在同一个网段,即两者要连在同一个路由器上。
2、建议最大线速度为0.2m/s,最大角速度为0.5°/s,扫描出来的地图效果最佳。
扫描完地图后,保存地图
Ctrl + Alt + T 打开新的终端,运行下面命令
$ ssh pi@192.168.11.100
$ roscd dashgo_nav/maps
$ rosrun map_server map_saver -f my_map
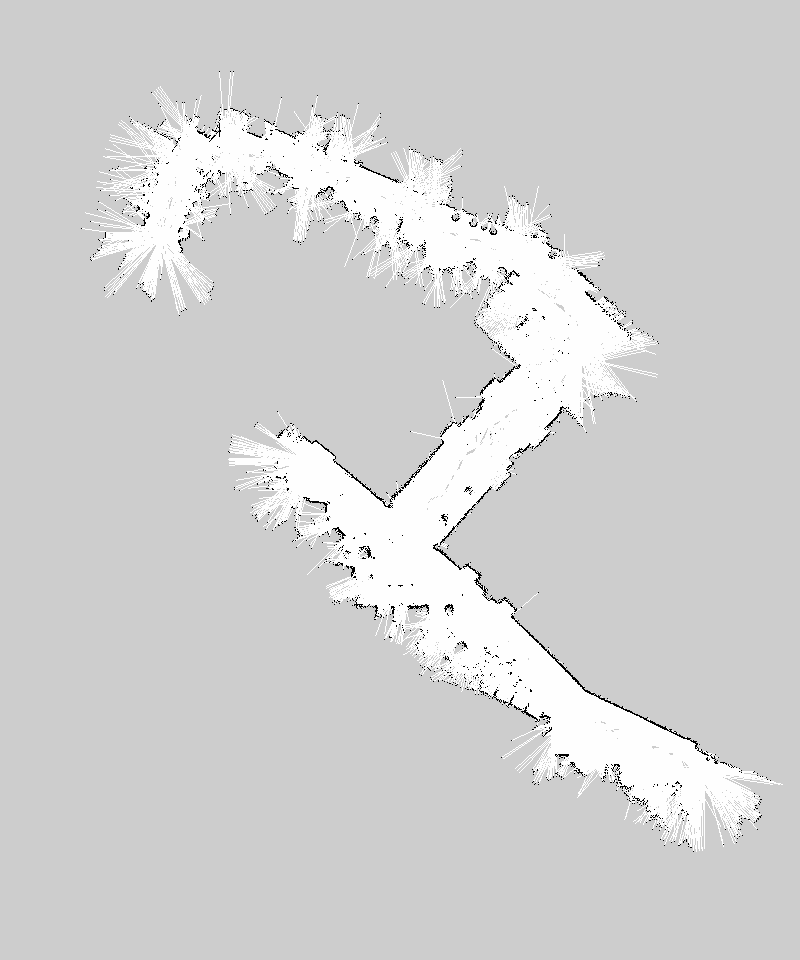
my_map是保存地图的名称,根据实际情况命名。
保存的地图效果如下图:
获取最新文章: 扫一扫右上角的二维码加入“创客智造”公众号