


一起做RGB-D SLAM (7)-添加回环检测
一起做RGB-D SLAM (7)-添加回环检测
说明:
- 上节介绍了图优化软件g2o的使用。
- 本节介绍实现一个简单的回环检测程序,利用g2o提升slam轨迹与地图的质量,得到一个完整的slam程序
简单回环检测的流程
上一讲的程序离完整的slam还有哪些距离。主要说来有两点:
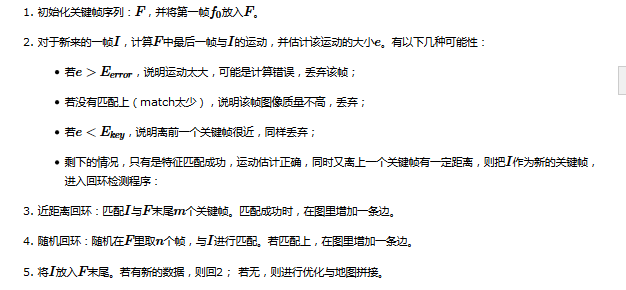
- 关键帧的提取。把每一帧都拼到地图是去是不明智的。因为帧与帧之间距离很近,导致地图需要频繁更新,浪费时间与空间。所以,我们希望,当机器人的运动超过一定间隔,就增加一个“关键帧”。最后只需把关键帧拼到地图里就行了。
- 回环的检测。回环的本质是识别曾经到过的地方。最简单的回环检测策略,就是把新来的关键帧与之前所有的关键帧进行比较,不过这样会导致越往后,需要比较的帧越多。所以,稍微快速一点的方法是在过去的帧里随机挑选一些,与之进行比较。更进一步的,也可以用图像处理/模式识别的方法计算图像间的相似性,对相似的图像进行检测。
把这两者合在一起,就得到了我们slam程序的基本流程。以下为伪码:
slam流程大体上如此
例如在线跑的话呢,可以定时进行一次优化与拼图。
或者,在成功检测到回环时,同时检测这两个帧附近的帧,那样得到的边就更多啦。
再有呢,如果要做实用的程序,还要考虑机器人如何运动,如果跟丢了怎么进行恢复等一些实际的问题呢。
实现代码
- 代码依旧是在上一讲的代码上进行更改得来的。
- 由于是完整的程序,稍微有些长,请大家慢慢看:
vim src/slam.cpp
/*************************************************************************
    > File Name: rgbd-slam-tutorial-gx/part V/src/visualOdometry.cpp
    > Author: xiang gao
    > Mail: gaoxiang12@mails.tsinghua.edu.cn
    > Created Time: 2015年08月15日 星期六 15时35分42秒
    * add g2o slam end to visual odometry
    * add keyframe and simple loop closure
 ************************************************************************/

#include <iostream>
#include <fstream>
#include <sstream>
using namespace std;

#include "slamBase.h"

#include <pcl/filters/voxel_grid.h>
#include <pcl/filters/passthrough.h>

#include <g2o/types/slam3d/types_slam3d.h>
#include <g2o/core/sparse_optimizer.h>
#include <g2o/core/block_solver.h>
#include <g2o/core/factory.h>
#include <g2o/core/optimization_algorithm_factory.h>
#include <g2o/core/optimization_algorithm_gauss_newton.h>
#include <g2o/solvers/csparse/linear_solver_csparse.h>
#include <g2o/core/robust_kernel.h>
#include <g2o/core/robust_kernel_factory.h>
#include <g2o/core/optimization_algorithm_levenberg.h>

// 把g2o的定义放到前面
typedef g2o::BlockSolver_6_3 SlamBlockSolver;
typedef g2o::LinearSolverCSparse< SlamBlockSolver::PoseMatrixType > SlamLinearSolver;

// 给定index,读取一帧数据
FRAME readFrame( int index, ParameterReader& pd );
// 估计一个运动的大小
double normofTransform( cv::Mat rvec, cv::Mat tvec );

// 检测两个帧,结果定义
enum CHECK_RESULT {NOT_MATCHED=0, TOO_FAR_AWAY, TOO_CLOSE, KEYFRAME};
// 函数声明
CHECK_RESULT checkKeyframes( FRAME& f1, FRAME& f2, g2o::SparseOptimizer& opti, bool is_loops=false );
// 检测近距离的回环
void checkNearbyLoops( vector<FRAME>& frames, FRAME& currFrame, g2o::SparseOptimizer& opti );
// 随机检测回环
void checkRandomLoops( vector<FRAME>& frames, FRAME& currFrame, g2o::SparseOptimizer& opti );

int main( int argc, char** argv )
{
    // 前面部分和vo是一样的
    ParameterReader pd;
    int startIndex  =   atoi( pd.getData( "start_index" ).c_str() );
    int endIndex    =   atoi( pd.getData( "end_index"   ).c_str() );

    // 所有的关键帧都放在了这里
    vector< FRAME > keyframes;
    // initialize
    cout<<"Initializing ..."<<endl;
    int currIndex = startIndex; // 当前索引为currIndex
    FRAME currFrame = readFrame( currIndex, pd ); // 当前帧数据

    string detector = pd.getData( "detector" );
    string descriptor = pd.getData( "descriptor" );
    CAMERA_INTRINSIC_PARAMETERS camera = getDefaultCamera();
    computeKeyPointsAndDesp( currFrame, detector, descriptor );
    PointCloud::Ptr cloud = image2PointCloud( currFrame.rgb, currFrame.depth, camera );

    /*******************************
    // 新增:有关g2o的初始化
    *******************************/
    // 初始化求解器
    SlamLinearSolver* linearSolver = new SlamLinearSolver();
    linearSolver->setBlockOrdering( false );
    SlamBlockSolver* blockSolver = new SlamBlockSolver( linearSolver );
    g2o::OptimizationAlgorithmLevenberg* solver = new g2o::OptimizationAlgorithmLevenberg( blockSolver );

    g2o::SparseOptimizer globalOptimizer;  // 最后用的就是这个东东
    globalOptimizer.setAlgorithm( solver );
    // 不要输出调试信息
    globalOptimizer.setVerbose( false );


    // 向globalOptimizer增加第一个顶点
    g2o::VertexSE3* v = new g2o::VertexSE3();
    v->setId( currIndex );
    v->setEstimate( Eigen::Isometry3d::Identity() ); //估计为单位矩阵
    v->setFixed( true ); //第一个顶点固定,不用优化
    globalOptimizer.addVertex( v );

    keyframes.push_back( currFrame );

    double keyframe_threshold = atof( pd.getData("keyframe_threshold").c_str() );

    bool check_loop_closure = pd.getData("check_loop_closure")==string("yes");
    for ( currIndex=startIndex+1; currIndex<endIndex; currIndex++ )
    {
        cout<<"Reading files "<<currIndex<<endl;
        FRAME currFrame = readFrame( currIndex,pd ); // 读取currFrame
        computeKeyPointsAndDesp( currFrame, detector, descriptor ); //提取特征
        CHECK_RESULT result = checkKeyframes( keyframes.back(), currFrame, globalOptimizer ); //匹配该帧与keyframes里最后一帧
        switch (result) // 根据匹配结果不同采取不同策略
        {
        case NOT_MATCHED:
            //没匹配上,直接跳过
            cout<<RED"Not enough inliers."<<endl;
            break;
        case TOO_FAR_AWAY:
            // 太近了,也直接跳
            cout<<RED"Too far away, may be an error."<<endl;
            break;
        case TOO_CLOSE:
            // 太远了,可能出错了
            cout<<RESET"Too close, not a keyframe"<<endl;
            break;
        case KEYFRAME:
            cout<<GREEN"This is a new keyframe"<<endl;
            // 不远不近,刚好
            /**
             * This is important!!
             * This is important!!
             * This is important!!
             * (very important so I've said three times!)
             */
            // 检测回环
            if (check_loop_closure)
            {
                checkNearbyLoops( keyframes, currFrame, globalOptimizer );
                checkRandomLoops( keyframes, currFrame, globalOptimizer );
            }
            keyframes.push_back( currFrame );
            break;
        default:
            break;
        }

    }

    // 优化
    cout<<RESET"optimizing pose graph, vertices: "<<globalOptimizer.vertices().size()<<endl;
    globalOptimizer.save("./data/result_before.g2o");
    globalOptimizer.initializeOptimization();
    globalOptimizer.optimize( 100 ); //可以指定优化步数
    globalOptimizer.save( "./data/result_after.g2o" );
    cout<<"Optimization done."<<endl;

    // 拼接点云地图
    cout<<"saving the point cloud map..."<<endl;
    PointCloud::Ptr output ( new PointCloud() ); //全局地图
    PointCloud::Ptr tmp ( new PointCloud() );

    pcl::VoxelGrid<PointT> voxel; // 网格滤波器,调整地图分辨率
    pcl::PassThrough<PointT> pass; // z方向区间滤波器,由于rgbd相机的有效深度区间有限,把太远的去掉
    pass.setFilterFieldName("z");
    pass.setFilterLimits( 0.0, 4.0 ); //4m以上就不要了

    double gridsize = atof( pd.getData( "voxel_grid" ).c_str() ); //分辨图可以在parameters.txt里调
    voxel.setLeafSize( gridsize, gridsize, gridsize );

    for (size_t i=0; i<keyframes.size(); i++)
    {
        // 从g2o里取出一帧
        g2o::VertexSE3* vertex = dynamic_cast<g2o::VertexSE3*>(globalOptimizer.vertex( keyframes[i].frameID ));
        Eigen::Isometry3d pose = vertex->estimate(); //该帧优化后的位姿
        PointCloud::Ptr newCloud = image2PointCloud( keyframes[i].rgb, keyframes[i].depth, camera ); //转成点云
        // 以下是滤波
        voxel.setInputCloud( newCloud );
        voxel.filter( *tmp );
        pass.setInputCloud( tmp );
        pass.filter( *newCloud );
        // 把点云变换后加入全局地图中
        pcl::transformPointCloud( *newCloud, *tmp, pose.matrix() );
        *output += *tmp;
        tmp->clear();
        newCloud->clear();
    }

    voxel.setInputCloud( output );
    voxel.filter( *tmp );
    //存储
    pcl::io::savePCDFile( "./data/result.pcd", *tmp );

    cout<<"Final map is saved."<<endl;
    globalOptimizer.clear();

    return 0;
}

FRAME readFrame( int index, ParameterReader& pd )
{
    FRAME f;
    string rgbDir   =   pd.getData("rgb_dir");
    string depthDir =   pd.getData("depth_dir");

    string rgbExt   =   pd.getData("rgb_extension");
    string depthExt =   pd.getData("depth_extension");

    stringstream ss;
    ss<<rgbDir<<index<<rgbExt;
    string filename;
    ss>>filename;
    f.rgb = cv::imread( filename );

    ss.clear();
    filename.clear();
    ss<<depthDir<<index<<depthExt;
    ss>>filename;

    f.depth = cv::imread( filename, -1 );
    f.frameID = index;
    return f;
}

double normofTransform( cv::Mat rvec, cv::Mat tvec )
{
    return fabs(min(cv::norm(rvec), 2*M_PI-cv::norm(rvec)))+ fabs(cv::norm(tvec));
}

CHECK_RESULT checkKeyframes( FRAME& f1, FRAME& f2, g2o::SparseOptimizer& opti, bool is_loops)
{
    static ParameterReader pd;
    static int min_inliers = atoi( pd.getData("min_inliers").c_str() );
    static double max_norm = atof( pd.getData("max_norm").c_str() );
    static double keyframe_threshold = atof( pd.getData("keyframe_threshold").c_str() );
    static double max_norm_lp = atof( pd.getData("max_norm_lp").c_str() );
    static CAMERA_INTRINSIC_PARAMETERS camera = getDefaultCamera();
    static g2o::RobustKernel* robustKernel = g2o::RobustKernelFactory::instance()->construct( "Cauchy" );
    // 比较f1 和 f2
    RESULT_OF_PNP result = estimateMotion( f1, f2, camera );
    if ( result.inliers < min_inliers ) //inliers不够,放弃该帧
        return NOT_MATCHED;
    // 计算运动范围是否太大
    double norm = normofTransform(result.rvec, result.tvec);
    if ( is_loops == false )
    {
        if ( norm >= max_norm )
            return TOO_FAR_AWAY;   // too far away, may be error
    }
    else
    {
        if ( norm >= max_norm_lp)
            return TOO_FAR_AWAY;
    }

    if ( norm <= keyframe_threshold )
        return TOO_CLOSE;   // too adjacent frame
    // 向g2o中增加这个顶点与上一帧联系的边
    // 顶点部分
    // 顶点只需设定id即可
    if (is_loops == false)
    {
        g2o::VertexSE3 *v = new g2o::VertexSE3();
        v->setId( f2.frameID );
        v->setEstimate( Eigen::Isometry3d::Identity() );
        opti.addVertex(v);
    }
    // 边部分
    g2o::EdgeSE3* edge = new g2o::EdgeSE3();
    // 连接此边的两个顶点id
    edge->vertices() [0] = opti.vertex( f1.frameID );
    edge->vertices() [1] = opti.vertex( f2.frameID );
    edge->setRobustKernel( robustKernel );
    // 信息矩阵
    Eigen::Matrix<double, 6, 6> information = Eigen::Matrix< double, 6,6 >::Identity();
    // 信息矩阵是协方差矩阵的逆,表示我们对边的精度的预先估计
    // 因为pose为6D的,信息矩阵是6*6的阵,假设位置和角度的估计精度均为0.1且互相独立
    // 那么协方差则为对角为0.01的矩阵,信息阵则为100的矩阵
    information(0,0) = information(1,1) = information(2,2) = 100;
    information(3,3) = information(4,4) = information(5,5) = 100;
    // 也可以将角度设大一些,表示对角度的估计更加准确
    edge->setInformation( information );
    // 边的估计即是pnp求解之结果
    Eigen::Isometry3d T = cvMat2Eigen( result.rvec, result.tvec );
    edge->setMeasurement( T.inverse() );
    // 将此边加入图中
    opti.addEdge(edge);
    return KEYFRAME;
}

void checkNearbyLoops( vector<FRAME>& frames, FRAME& currFrame, g2o::SparseOptimizer& opti )
{
    static ParameterReader pd;
    static int nearby_loops = atoi( pd.getData("nearby_loops").c_str() );

    // 就是把currFrame和 frames里末尾几个测一遍
    if ( frames.size() <= nearby_loops )
    {
        // no enough keyframes, check everyone
        for (size_t i=0; i<frames.size(); i++)
        {
            checkKeyframes( frames[i], currFrame, opti, true );
        }
    }
    else
    {
        // check the nearest ones
        for (size_t i = frames.size()-nearby_loops; i<frames.size(); i++)
        {
            checkKeyframes( frames[i], currFrame, opti, true );
        }
    }
}

void checkRandomLoops( vector<FRAME>& frames, FRAME& currFrame, g2o::SparseOptimizer& opti )
{
    static ParameterReader pd;
    static int random_loops = atoi( pd.getData("random_loops").c_str() );
    srand( (unsigned int) time(NULL) );
    // 随机取一些帧进行检测

    if ( frames.size() <= random_loops )
    {
        // no enough keyframes, check everyone
        for (size_t i=0; i<frames.size(); i++)
        {
            checkKeyframes( frames[i], currFrame, opti, true );
        }
    }
    else
    {
        // randomly check loops
        for (int i=0; i<random_loops; i++)
        {
            int index = rand()%frames.size();
            checkKeyframes( frames[index], currFrame, opti, true );
        }
    }
}
代码注解:
回环检测是很怕"false positive"的,即“将实际上不同的地方当成了同一处”,这会导致地图出现明显的不一致。所以,在使用g2o时,要在边里添加"robust kernel",保证一两个错误的边不会影响整体结果。
我在slambase.h里添加了一些彩色输出代码。运行此程序时,出现绿色信息则是添加新的关键帧,红色为出错。
parameters.txt里定义了检测回环的一些参数:
#part 7
keyframe_threshold=0.1
max_norm_lp=5.0
# Loop closure
check_loop_closure=yes
nearby_loops=5
random_loops=5
- 其中,nearby_loops就是m,random_loops就是n啦。
- 这两个数如果设大一些,匹配的帧就会多,不过太大了就会影响整体速度了呢。
回环检测的效果
- 对代码进行编译,然后bin/slam即可看到程序运行啦。
- 添加了回环检测之后呢,g2o文件就不会像上次那样孤零零的啦,看起来是这样子的:

- 是不是感觉整条轨迹“如丝般顺滑”了呢?它不再是上一讲那样一根筋通到底,而是有很多帧间的匹配数据,保证了一两帧出错能被其他匹配数据给“拉回来”。
- 百度云上的数据最后拼出来是这样的哦(780帧,关键帧62张,帧率5Hz左右):

- 咖啡台左侧有明显的人通过的痕迹,导致地图上出现了他的身影:

- 这个就可以算作是基本的地图啦。
- 至此,slam的两大目标:“轨迹”和“地图”我们都已得到了,可以算是基本上解决了这个问题了。
后话:
- slam仍是一个开放的问题,尽管有人曾说“在slam领域发文章越来越难”,然而现在机器人几大期刊和会议(IJRR/TRO/RAM/JFD/ICRA/IROS...)仍有不少slam方面的文章。虽然我们“获取轨迹与地图”的目标已基本实现。
- 但仍有许多工作等我们去做,包括:
- 更好的数学模型(新的滤波器/图优化理论);
- 新的视觉特征/不使用特征的直接方法;
- 动态物体/人的处理;
- 地图描述/点云地图优化/语义地图
- 长时间/大规模/自动化slam
参考:
- 本讲代码:https://github.com/gaoxiang12/rgbd-slam-tutorial-gx/tree/master/part%20VII
- 数据:http://yun.baidu.com/s/1i33uvw5
获取最新文章: 扫一扫右上角的二维码加入“创客智造”公众号