ROS探索总结-34.rviz plugin
ROS探索总结-34.rviz plugin
说明:
- 在rviz中使用plugin来扩展资源
rviz是ROS官方的一款3D可视化工具,几乎我们需要用到的所有机器人相关数据都可以在rviz中展现,当然由于机器人系统的需求不同,很多时候rviz中已有的一些功能仍然无法满足我们的需求,这个时候rviz的plugin机制就派上用场了。上一篇我们探索了插件的概念和基本实现,这一篇通过rviz中的插件实现,来进行巩固加深。
rviz作为一种可扩展化的视图工具,可以使用这种插件机制来扩展丰富的功能,进行二次开发,我们在rviz中常常使用的激光数据可视化显示、图像数据可视化显示,其实都是官方提供的插件。所以,我们完全可以在rviz的基础上,打造属于我们自己的机器人人机界面。
目标
在《Mastering ROS for Robotics Programming》这本书的第六章,讲解了一个发布速度控制的rviz plugin,这里我们就根据这个plugin的实现来学习。
plugin的整体效果如下:
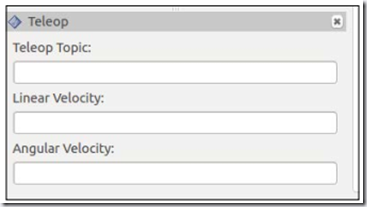
从上边的图片我们有一个大致的感性认识:
首先,这是一个可视化的界面,在ros的编程中,好像没有可视化的编程语句,那么如何实现可视化编程呢?如果你使用过ROS的rqt工具箱,应该就会想到Qt,没错,Qt是一个实现GUI的优秀框架,ROS中的可视化工具绝大部分都是基于Qt进行开发的,rviz的plugin也不例外。所以我们需要了解Qt的一些相关知识。
其次,这个界面里包含三个输入框,分别对应topic名称、线速度值、角速度值,这就需要我们读取用户的输入,然后转换成ROS的topic,这里也会涉及到Qt中的重要概念——信号、槽,类似于回调函数,可以自行百度学习一下。
接下来,我们就分步骤看一下如何实现这个plugin,也可以跟着一起做。
完整的功能包代码可以在github上下载。
创建功能包
首先,要创建一个功能包用来放置plugin的所有相关代码。这个功能包的依赖于rviz,因为rviz是基于Qt开发的,所以省去了对Qt的依赖。
$ catkin_create_pkg rviz_telop_commander roscpp rviz std_msgs
实现主代码
接下来,我们在功能包的src文件夹下开始做代码的实现,这个plugin相对简单,只需要一个cpp文件就可以完成,当然对应的还要有它的头文件。
- 头文件
#ifndef TELEOP_PAD_H
#define TELEOP_PAD_H
//所需要包含的头文件
#include <ros/ros.h>
#include <ros/console.h>
#include <rviz/panel.h>   //plugin基类的头文件

class QLineEdit;
namespace rviz_telop_commander
{

// 所有的plugin都必须是rviz::Panel的子类
class TeleopPanel: public rviz::Panel
{

// 后边需要用到Qt的信号和槽,都是QObject的子类,所以需要声明Q_OBJECT宏
Q_OBJECT

public:

  // 构造函数,在类中会用到QWidget的实例来实现GUI界面,这里先初始化为0即可
  TeleopPanel( QWidget* parent = 0 );
  // 重载rviz::Panel积累中的函数,用于保存、加载配置文件中的数据,在我们这个plugin
  // 中,数据就是topic的名称
  virtual void load( const rviz::Config& config );

  virtual void save( rviz::Config config ) const;

  // 公共槽
public Q_SLOTS:

  // 当用户输入topic的命名并按下回车后,回调用此槽来创建一个相应名称的topic publisher
  void setTopic( const QString& topic );

  // 内部槽.
protected Q_SLOTS:

  void sendVel();                 // 发布当前的速度值

  void update_Linear_Velocity();  // 根据用户的输入更新线速度值

  void update_Angular_Velocity(); // 根据用户的输入更新角速度值

  void updateTopic();             // 根据用户的输入更新topic name

  // 内部变量.
protected:

  // topic name输入框
  QLineEdit* output_topic_editor_;
  QString output_topic_;
  // 线速度值输入框
  QLineEdit* output_topic_editor_1;
  QString output_topic_1;
  // 角速度值输入框
  QLineEdit* output_topic_editor_2;
  QString output_topic_2;
  // ROS的publisher,用来发布速度topic
  ros::Publisher velocity_publisher_;
  // The ROS node handle.
  ros::NodeHandle nh_;
  // 当前保存的线速度和角速度值
  float linear_velocity_;
  float angular_velocity_;
};
} // end namespace rviz_plugin_tutorials

#endif // TELEOP_PANEL_H
- cpp文件
接下来是cpp代码文件 teleop_pad.cpp。
#include <stdio.h>
#include <QPainter>
#include <QLineEdit>
#include <QVBoxLayout>
#include <QHBoxLayout>
#include <QLabel>
#include <QTimer>
#include <geometry_msgs/Twist.h>
#include <QDebug>
#include "teleop_pad.h"

namespace rviz_telop_commander
{
// 构造函数,初始化变量
TeleopPanel::TeleopPanel( QWidget* parent )
  : rviz::Panel( parent )
  , linear_velocity_( 0 )
  , angular_velocity_( 0 )
{
  // 创建一个输入topic命名的窗口
  QVBoxLayout* topic_layout = new QVBoxLayout;

  topic_layout->addWidget( new QLabel( "Teleop Topic:" ));

  output_topic_editor_ = new QLineEdit;

  topic_layout->addWidget( output_topic_editor_ );

  // 创建一个输入线速度的窗口
  topic_layout->addWidget( new QLabel( "Linear Velocity:" ));

  output_topic_editor_1 = new QLineEdit;

  topic_layout->addWidget( output_topic_editor_1 );

  // 创建一个输入角速度的窗口
  topic_layout->addWidget( new QLabel( "Angular Velocity:" ));

  output_topic_editor_2 = new QLineEdit;

  topic_layout->addWidget( output_topic_editor_2 );

  QHBoxLayout* layout = new QHBoxLayout;

  layout->addLayout( topic_layout );

  setLayout( layout );

  // 创建一个定时器,用来定时发布消息
  QTimer* output_timer = new QTimer( this );

  // 设置信号与槽的连接
  connect( output_topic_editor_, SIGNAL( editingFinished() ), this, SLOT( updateTopic() ));             // 输入topic命名,回车后,调用updateTopic()

  connect( output_topic_editor_1, SIGNAL( editingFinished() ), this, SLOT( update_Linear_Velocity() )); // 输入线速度值,回车后,调用update_Linear_Velocity()

  connect( output_topic_editor_2, SIGNAL( editingFinished() ), this, SLOT( update_Angular_Velocity() ));// 输入角速度值,回车后,调用update_Angular_Velocity()

  // 设置定时器的回调函数,按周期调用sendVel()
  connect( output_timer, SIGNAL( timeout() ), this, SLOT( sendVel() ));

  // 设置定时器的周期,100ms
  output_timer->start( 100 );
}

// 更新线速度值
void TeleopPanel::update_Linear_Velocity()
{
    // 获取输入框内的数据
    QString temp_string = output_topic_editor_1->text();

    // 将字符串转换成浮点数
    float lin = temp_string.toFloat();

    // 保存当前的输入值
    linear_velocity_ = lin;
}

// 更新角速度值
void TeleopPanel::update_Angular_Velocity()
{
    QString temp_string = output_topic_editor_2->text();
    float ang = temp_string.toFloat() ;
    angular_velocity_ = ang;
}

// 更新topic命名
void TeleopPanel::updateTopic()
{
  setTopic( output_topic_editor_->text() );
}

// 设置topic命名
void TeleopPanel::setTopic( const QString& new_topic )
{
  // 检查topic是否发生改变.
  if( new_topic != output_topic_ )
  {
    output_topic_ = new_topic;

    // 如果命名为空,不发布任何信息
    if( output_topic_ == "" )
    {
      velocity_publisher_.shutdown();
    }

    // 否则,初始化publisher
    else
    {
      velocity_publisher_ = nh_.advertise<geometry_msgs::Twist>( output_topic_.toStdString(), 1 );
    }

    Q_EMIT configChanged();

  }
}

// 发布消息
void TeleopPanel::sendVel()
{
  if( ros::ok() && velocity_publisher_ )
  {
    geometry_msgs::Twist msg;
    msg.linear.x = linear_velocity_;
    msg.linear.y = 0;
    msg.linear.z = 0;
    msg.angular.x = 0;
    msg.angular.y = 0;
    msg.angular.z = angular_velocity_;

    velocity_publisher_.publish( msg );

  }
}

// 重载父类的功能
void TeleopPanel::save( rviz::Config config ) const
{

  rviz::Panel::save( config );

  config.mapSetValue( "Topic", output_topic_ );

}

// 重载父类的功能,加载配置数据
void TeleopPanel::load( const rviz::Config& config )
{

  rviz::Panel::load( config );

  QString topic;

  if( config.mapGetString( "Topic", &topic ))
  {

    output_topic_editor_->setText( topic );

    updateTopic();

  }
}
} // end namespace rviz_plugin_tutorials

// 声明此类是一个rviz的插件
#include <pluginlib/class_list_macros.h>

PLUGINLIB_EXPORT_CLASS(rviz_telop_commander::TeleopPanel,rviz::Panel )

// END_TUTORIAL
完成编译文件
为了编译成功,还需要完成一些编译文件的设置。
- plugin的描述文件
在功能包的根目录下需要创建一个plugin的描述文件 plugin_description.xml:
<library path="lib/librviz_telop_commander">
  <class name="rviz_telop_commander/Teleop"
         type="rviz_telop_commander::TeleopPanel"
        base_class_type="rviz::Panel">
    <description>
      A panel widget allowing simple diff-drive style robot base control.
        </description>
      </class>
    </library>
- package.xml
然后在 package.xml文件里添加plugin_description.xml。
      <export>

      <rviz plugin="${prefix}/plugin_description.xml"/>

  </export>
- CMakeLists.txt
当然, CMakeLists.txt文件也必须要加入相应的编译规则:
## This plugin includes Qt widgets, so we must include Qt like so:
find_package(Qt4 COMPONENTS QtCore QtGui REQUIRED)

include(${QT_USE_FILE})

## I prefer the Qt signals and slots to avoid defining "emit", "slots",

## etc because they can conflict with boost signals, so define QT_NO_KEYWORDS here.

add_definitions(-DQT_NO_KEYWORDS)

## Here we specify which header files need to be run through "moc",

## Qt's meta-object compiler.

qt4_wrap_cpp(MOC_FILES
  src/teleop_pad.h

)

## Here we specify the list of source files, including the output of

## the previous command which is stored in ``${MOC_FILES}``.

set(SOURCE_FILES
  src/teleop_pad.cpp
  ${MOC_FILES}
)

## An rviz plugin is just a shared library, so here we declare the

## library to be called ``${PROJECT_NAME}`` (which is

## "rviz_plugin_tutorials", or whatever your version of this project

## is called) and specify the list of source files we collected above

## in ``${SOURCE_FILES}``.

add_library(${PROJECT_NAME} ${SOURCE_FILES})

## Link the library with whatever Qt libraries have been defined by

## the ``find_package(Qt4 ...)`` line above, and with whatever libraries

## catkin has included.

##

## Although this puts "rviz_plugin_tutorials" (or whatever you have

## called the project) as the name of the library, cmake knows it is a

## library and names the actual file something like

## "librviz_plugin_tutorials.so", or whatever is appropriate for your

## particular OS.

target_link_libraries(${PROJECT_NAME} ${QT_LIBRARIES} ${catkin_LIBRARIES})
现在就可以开始编译了。
实现效果
编译成功后,我们来运行rviz,需要注意的是:一定要source devel文件夹下的setup脚本,来生效路径,否则会找不到插件:
$ rosrun rviz rviz
启动之后应该并没有什么不同,点击菜单栏中的“Panels”选项,选择“Add New Panel”,在打开的窗口中的最下方,就可以看到我们创建的plugin了,点中之后,可以在下方的"Description"中看到我们在plugin_description.xml文件中对plugin的描述。
启动之后应该并没有什么不同,点击菜单栏中的“Panels”选项,选择“Add New Panel”,在打开的窗口中的最下方,就可以看到我们创建的plugin了,点中之后,可以在下方的"Description"中看到我们在plugin_description.xml文件中对plugin的描述。
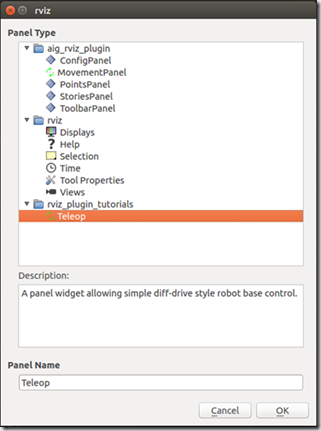
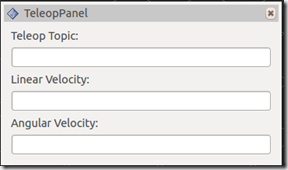
点击“OK”,就会弹出“TeleopPanel”插件:
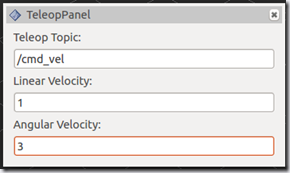
分别填写三行所对应的内容:
然后打开一个终端查看消息:
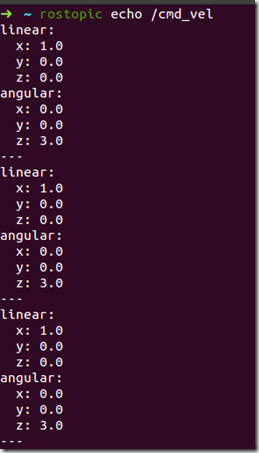
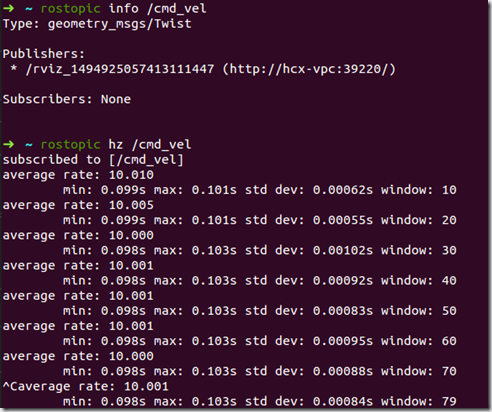
实现一个rviz的plugin是不是很简单,重点是理解ROS和Qt的结合使用。使用类似的方法和Qt的编程技巧,就可以基于rviz打造属于自己的人机交互界面了。
获取最新文章: 扫一扫右上角的二维码加入“创客智造”公众号


