


ROS与Arduino-Temperature Sensor(温度传感器)
纠错,疑问,交流: 请进入讨论区或 请点击进入页面,扫码加入微信群或Q群进行交流
获取最新文章: 扫一扫加入“创客智造”公众号
Temperature Sensor(温度传感器)
说明
- 这个教程展示如何通过Arduino和TMP102测量温度
- 展示如何建立一个温度传感器节点
- 展示ROS如何通过SPI/I2C可以简单连接Arduino
硬件
- Arduino uno
- TMP102 温度传感器
- 非常小的温度传感器
- 非常容易和Arduino uno连接
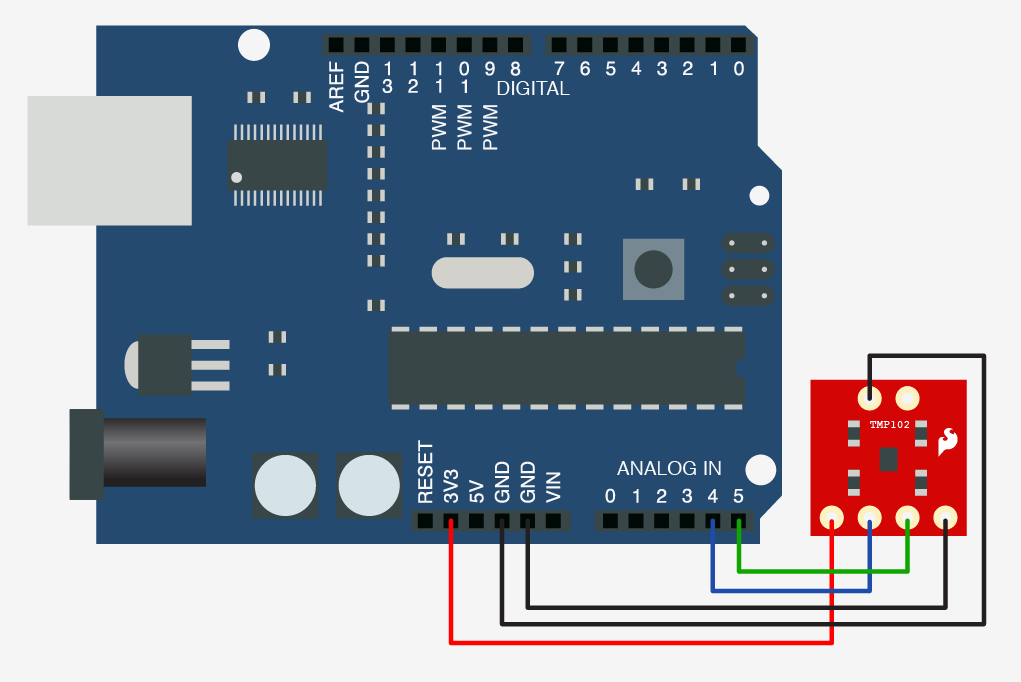
- 3.3V电压可以跟Arduino的3.3V output,GND, SDA, SCL
- SDA和SCL是I2C的数据和锁独立的,对应的Arduino的模拟插脚4和5
连接图
代码
#include <Wire.h>
#include <ros.h>
#include <std_msgs/Float32.h>


//Set up the ros node and publisher
std_msgs::Float32 temp_msg;
ros::Publisher pub_temp("temperature", &temp_msg);
ros::NodeHandle nh;

int sensorAddress = 0x91 >> 1;  // From datasheet sensor address is 0x91
                                // shift the address 1 bit right,
                                 //the Wire library only needs the 7
                                // most significant bits for the address

void setup()
{
  Wire.begin();        // join i2c bus (address optional for master)

  nh.initNode();
  nh.advertise(pub_temp);

}

long publisher_timer;

void loop()
{

  if (millis() > publisher_timer) {
  // step 1: request reading from sensor
    Wire.requestFrom(sensorAddress,2);
    delay(10);
    if (2 <= Wire.available())  // if two bytes were received
    {
      byte msb;
      byte lsb;
      int temperature;

      msb = Wire.read();  // receive high byte (full degrees)
      lsb = Wire.read();  // receive low byte (fraction degrees)
      temperature = ((msb) << 4);  // MSB
      temperature |= (lsb >> 4);   // LSB

      temp_msg.data = temperature*0.0625;
      pub_temp.publish(&temp_msg);
    }

  publisher_timer = millis() + 1000; //publish once a second
  }

  nh.spinOnce();
}这个例子使用Arduino的wire库,Wire是一个I2C读写库
测试
roscore
rosrun rosserial_python serial_node.py _port:=/dev/ttyUSB0
rostopic echo temperature
纠错,疑问,交流: 请进入讨论区或 请点击进入页面,扫码加入微信群或Q群进行交流
获取最新文章: 扫一扫加入“创客智造”公众号