Arduino内置教程-USB-键盘鼠标控制
键盘鼠标控制
这个例子示范了怎么用鼠标键盘库文件。5个即时开关作为你光标的定向按键。当一个按键按下,你屏幕上的光标将会移动,而且和有方向的字母相联系的按下按键,会被发送到电脑。一旦你编译好Leonardo, Micro or Due,并且连好线,打开你的文本编译器来看结果。
注意:当你用鼠标键盘库函数时,Arduino会接管你的电脑键盘!为了确保你没有失去对电脑的控制同时运行这个函数,确定在你调用Mouse.move()前,启动一个可靠的控制系统。
硬件要求
- Arduino Leonardo, Micro or Arduino Due 开发板
- 5 按键
- 5 10k ohm 电阻
- 连接线
- 面包板
软件要求
- 任何文本编译器
电路
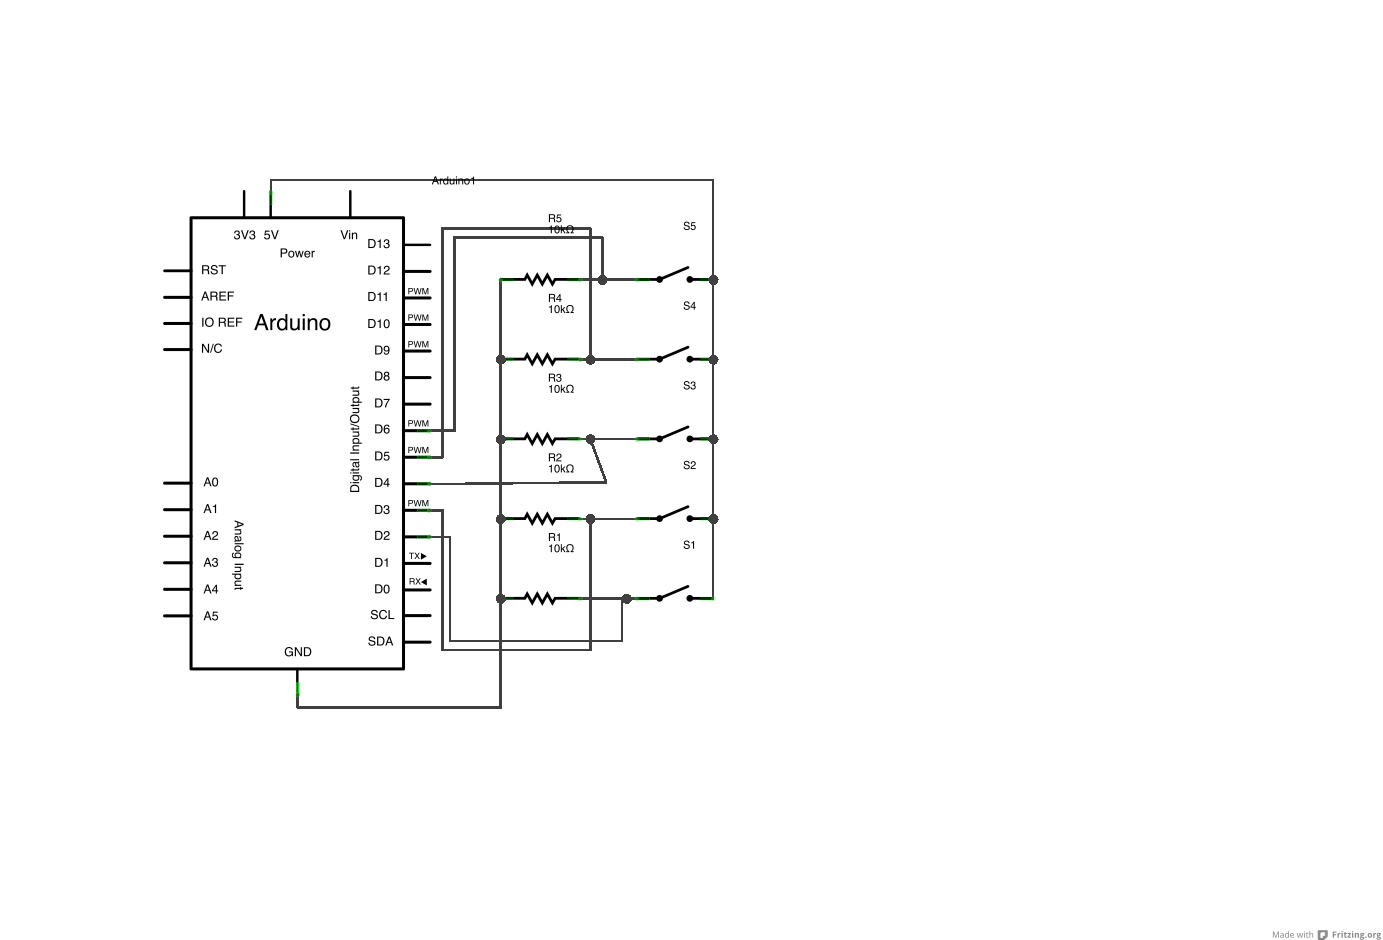
分别连接按键的一端到开发板的pin2,3,4,5,和6上。连接另一端到5V电源。为这些开关各提供一个下拉电阻,开关通过电阻连接到地。
一旦你编译好的你的开发板,插上USB线并打开一个文本编译器。连接你的开发板和电脑,并且在移动光标时按下按键写入文件。

图由 Fritzing 软件绘制
原理图

样例代码
/*
  KeyboardAndMouseControl

 Controls the mouse from five pushbuttons on an Arduino Leonardo, Micro or Due.

 Hardware:
 * 5 pushbuttons attached to D2, D3, D4, D5, D6

 The mouse movement is always relative. This sketch reads
 four pushbuttons, and uses them to set the movement of the mouse.

 WARNING:  When you use the Mouse.move() command, the Arduino takes
 over your mouse!  Make sure you have control before you use the mouse commands.

 created 15 Mar 2012
 modified 27 Mar 2012
 by Tom Igoe

 this code is in the public domain

 */

#include "Keyboard.h"
#include "Mouse.h"

// set pin numbers for the five buttons:
const int upButton = 2;
const int downButton = 3;
const int leftButton = 4;
const int rightButton = 5;
const int mouseButton = 6;

void setup() { // initialize the buttons' inputs:
  pinMode(upButton, INPUT);
  pinMode(downButton, INPUT);
  pinMode(leftButton, INPUT);
  pinMode(rightButton, INPUT);
  pinMode(mouseButton, INPUT);

  Serial.begin(9600);
  // initialize mouse control:
  Mouse.begin();
  Keyboard.begin();
}

void loop() {
  // use serial input to control the mouse:
  if (Serial.available() > 0) {
    char inChar = Serial.read();

    switch (inChar) {
      case 'u':
        // move mouse up
        Mouse.move(0, -40);
        break;
      case 'd':
        // move mouse down
        Mouse.move(0, 40);
        break;
      case 'l':
        // move mouse left
        Mouse.move(-40, 0);
        break;
      case 'r':
        // move mouse right
        Mouse.move(40, 0);
        break;
      case 'm':
        // perform mouse left click
        Mouse.click(MOUSE_LEFT);
        break;
    }
  }

  // use the pushbuttons to control the keyboard:
  if (digitalRead(upButton) == HIGH) {
    Keyboard.write('u');
  }
  if (digitalRead(downButton) == HIGH) {
    Keyboard.write('d');
  }
  if (digitalRead(leftButton) == HIGH) {
    Keyboard.write('l');
  }
  if (digitalRead(rightButton) == HIGH) {
    Keyboard.write('r');
  }
  if (digitalRead(mouseButton) == HIGH) {
    Keyboard.write('m');
  }

}
更多
- Keyboard.write()
- Keyboard.print()
- Keyboard.println()
- KeyboardLogout - 利用按键命令注销当前使用者
- KeyboardMessage - 当一个按键被按下,发送一个文本字符串。
- KeyboardReprogram - 在Arduino IDE上打开一个新窗口,用简单的跑马灯程序重新编译Leonardo
- KeyboardSerial - 从串口里读取一个字节,然后返回一个键值。
- KeyboardAndMouseControl - 在一个程序里示范鼠标和键盘命令
- ButtonMouseControl - 通过5个按键控制光标行动
- JoystickMouseControl - 当按键被按下时,通过一个操纵杆来控制电脑光标的行动
获取最新文章: 扫一扫右上角的二维码加入“创客智造”公众号


