


Arduino内置教程-基本原理-渐变
纠错,疑问,交流: 请进入讨论区或 请点击进入页面,扫码加入微信群或Q群进行交流
获取最新文章: 扫一扫加入“创客智造”公众号
渐变
- 这个例子示范怎么使用 analogWrite() 函数来使LED灯逐渐变亮和变暗。
- 模拟写入是使用调幅脉冲(PWM),快速切换数字引脚的开关状态来达到渐明渐暗的效果
硬件要求
- Arduino or Genuino 开发板
- LED
- 220 ohm 电阻
- 连接线
- 面包板
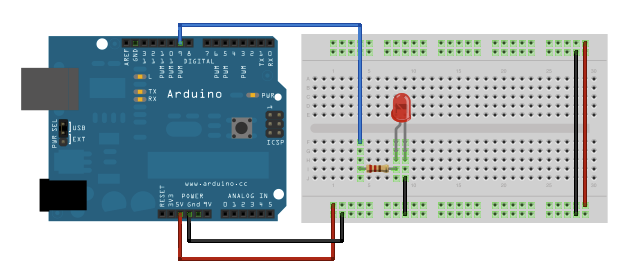
电路
把LED灯的阳极(较长,正极的引脚)通过一个220 ohm的电阻连接到开发板上的数字输出引脚pin9。阴极(较短,负极的引脚)连接到地。
原理图
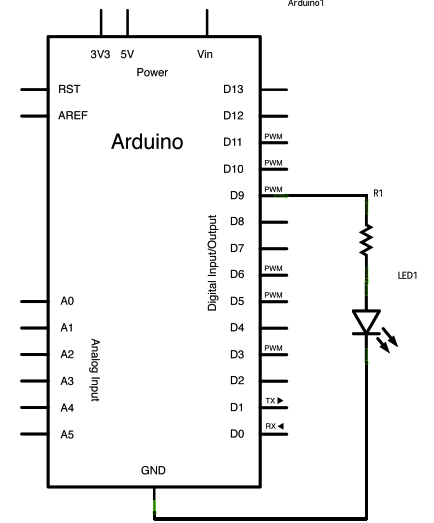 这个图是用 Fritzing制作的。更多的电路例子参考Fritzing project page
样例代码
-
声明pin9作为LED的引脚后,不用在setup()函数里加入其他语句。
-
你要在主循环里用analogWrite()函数来提供两个参数:一个调用这个引脚写入的函数,一个写入PWM的值。
-
为了使LED灯渐明和渐暗,从0到255逐渐增加PWM值,然后回到0,重复循环。在下面程序里,这个PWM值是用一个brightness的变量来控制。每次循环,它都跟随变量fadeAmount的值增加而增加。
-
如果brightness在它的值的极端(0或者255),那么fadeAmount变为负极。换句话,如果fadeAmount是5,那么它被设为-5。如果它是-5,那么它被设为5。循环的下一次,这个变化同样会引起brightness改变方向。
-
analogWrite() 可以很快地改变PWM值,所以程序后面的延迟控制渐变的速度。试下改变延时的时间,然后看它怎么影响LED灯渐变。
/*
 Fade

 This example shows how to fade an LED on pin 9
 using the analogWrite() function.

 The analogWrite() function uses PWM, so if
 you want to change the pin you're using, be
 sure to use another PWM capable pin. On most
 Arduino, the PWM pins are identified with
 a "~" sign, like ~3, ~5, ~6, ~9, ~10 and ~11.

 This example code is in the public domain.
 */

int led = 9;           // the PWM pin the LED is attached to
int brightness = 0;    // how bright the LED is
int fadeAmount = 5;    // how many points to fade the LED by

// the setup routine runs once when you press reset:
void setup() {
  // declare pin 9 to be an output:
  pinMode(led, OUTPUT);
}

// the loop routine runs over and over again forever:
void loop() {
  // set the brightness of pin 9:
  analogWrite(led, brightness);

  // change the brightness for next time through the loop:
  brightness = brightness + fadeAmount;

  // reverse the direction of the fading at the ends of the fade:
  if (brightness <= 0 || brightness >= 255) {
    fadeAmount = -fadeAmount;
  }
  // wait for 30 milliseconds to see the dimming effect
  delay(30);
}更多
- setup()
- loop()
- analogWrite()
- int
- for
- PWM
- AnalogReadSerial - 读取电位计,并打印它的状态到Arduino串口监视器
- BareMinimum - 需要开始一个新的程序的最简框架
- Blink - 使LED灯开和关
- DigitalReadSerial - 读取一个开关,打印其状态到Arduino串口监视器
纠错,疑问,交流: 请进入讨论区或 请点击进入页面,扫码加入微信群或Q群进行交流
获取最新文章: 扫一扫加入“创客智造”公众号