


搭建ROS小车底盘B-使用Kinect2建图
纠错,疑问,交流: 请进入讨论区或 请点击进入页面,扫码加入微信群或Q群进行交流
获取最新文章: 扫一扫加入“创客智造”公众号
搭建ROS小车底盘B-使用Kinect2建图
说明:
- 此教程我将利用KinectV2得到的激光数据和Gmapping来建图
- 利用之前搭建的stm32底盘和kinect2
安装依赖包
- 安装Gmapping包
$ cd ~/catkin_ws/src
$ git clone  https://github.com/ros-perception/slam_gmapping.git
$ cd ~/catkin_ws
$ catkin_make
$ rospack profile- 在我们之前的建的bringup/launch/下新建kinect2_gmapping.launch文件
$ cd ~/catkin_ws/bringup/launch/
$ touch kinect2_gmapping.launch
$ vim kinect2_gmapping.launch- 代码如下:
<?xml version="1.0"?>

<launch>
    <!-- start kinect2-->
    <include file="$(find kinect2_bridge)/launch/kinect2_bridge.launch">
        <arg name="base_name"         value="kinect2"/>
        <arg name="sensor"            value=""/>
        <arg name="publish_tf"        value="true"/>
        <arg name="base_name_tf"      value="kinect2"/>
        <arg name="fps_limit"         value="-1.0"/>
        <arg name="calib_path"        value="$(find kinect2_bridge)/data/"/>
        <arg name="use_png"           value="false"/>
        <arg name="jpeg_quality"      value="90"/>
        <arg name="png_level"         value="1"/>
        <arg name="depth_method"      value="default"/>
        <arg name="depth_device"      value="-1"/>
        <arg name="reg_method"        value="default"/>
        <arg name="reg_device"        value="-1"/>
        <arg name="max_depth"         value="12.0"/>
        <arg name="min_depth"         value="0.1"/>
        <arg name="queue_size"        value="5"/>
        <arg name="bilateral_filter"  value="true"/>
        <arg name="edge_aware_filter" value="true"/>
        <arg name="worker_threads"    value="4"/>
    </include>

  <!-- Run the depthimage_to_laserscan node -->
  <node pkg="depthimage_to_laserscan" type="depthimage_to_laserscan" name="depthimage_to_laserscan" output="screen">
    <!--输入图像-->
    <remap from="image" to="/kinect2/qhd/image_depth_rect"/>
    <!--相关图像的相机信息。通常不需要重新变形,因为camera_info将从与图像相同的命名空间订阅。-->
    <remap from="camera_info" to="/kinect2/qhd/camera_info" />
    <!--输出激光数据的话题-->
    <remap from="scan" to="/scan" />

        <!--激光扫描的帧id。对于来自具有Z向前的“光学”帧的点云,该值应该被设置为具有X向前和Z向上的相应帧。-->
    <param name="output_frame_id" value="/kinect2_depth_frame"/>
    <!--用于生成激光扫描的像素行数。对于每一列,扫描将返回在图像中垂直居中的那些像素的最小值。-->
    <param name="scan_height" value="30"/>
    <!--返回的最小范围(以米为单位)。小于该范围的输出将作为-Inf输出。-->
    <param name="range_min" value="0.45"/>
    <!--返回的最大范围(以米为单位)。大于此范围将输出为+ Inf。-->
    <param name="range_max" value="8.00"/>
  </node>

    <!--start gmapping node -->
    <node pkg="gmapping" type="slam_gmapping" name="simple_gmapping" output="screen">
        <param name="map_update_interval" value="5.0"/>
        <param name="maxUrange" value="5.0"/>
        <param name="maxRange" value="6.0"/>
        <param name="sigma" value="0.05"/>
        <param name="kernelSize" value="1"/>
        <param name="lstep" value="0.05"/>
        <param name="astep" value="0.05"/>
        <param name="iterations" value="5"/>
        <param name="lsigma" value="0.075"/>
        <param name="ogain" value="3.0"/>
        <param name="lskip" value="0"/>
        <param name="minimumScore" value="50"/>
        <param name="srr" value="0.1"/>
        <param name="srt" value="0.2"/>
        <param name="str" value="0.1"/>
        <param name="stt" value="0.2"/>
        <param name="linearUpdate" value="1.0"/>
        <param name="angularUpdate" value="0.5"/>
        <param name="temporalUpdate" value="3.0"/>
        <param name="resampleThreshold" value="0.5"/>
        <param name="particles" value="50"/>
        <param name="xmin" value="-5.0"/>
        <param name="ymin" value="-5.0"/>
        <param name="xmax" value="5.0"/>
        <param name="ymax" value="5.0"/>
        <param name="delta" value="0.05"/>
        <param name="llsamplerange" value="0.01"/>
        <param name="llsamplestep" value="0.01"/>
        <param name="lasamplerange" value="0.005"/>
        <param name="lasamplestep" value="0.005"/>
    </node>

    <!--start serial-port and odometry node-->
    <node name="base_controller" pkg="base_controller" type="base_controller"/>

    <!-- static_transform_publisher x y z yaw pitch roll frame_id child_frame_id period_in_ms -->
  <node pkg="tf" type="static_transform_publisher" name="base_footprint_to_base_link" args="0 0 0.5 0 0 0 base_footprint base_link 50" />
  <node pkg="tf" type="static_transform_publisher" name="base_link_to_laser" args="0 0 0.5 0 0 0 base_link laser 50" />
  <node pkg="tf" type="static_transform_publisher" name="base_link_to_kinect2laser" args="0 0 0.5 0 0 0 base_link kinect2_depth_frame 50" />
  <node pkg="tf" type="static_transform_publisher" name="base_link_to_kinect2_link" args="0 0 0.5 -1.57 0 -1.57 base_link kinect2_link 50" />

</launch>- 在我们之前的建的bringup/launch/下新建kinect2_gmapping_rviz_view.launch文件
- 我们这里不把启动RVIZ写在kinect2_gmapping.launch里是方便以后的远程启动
$ cd ~/catkin_ws/bringup/launch/
$ touch kinect2_gmapping_rviz_view.launch
$ vim kinect2_gmapping_rviz_view.launch- 内容如下:
<?xml version="1.0"?>

<launch>

    <!--start rviz view -->
    <node name="rviz" pkg="rviz" type="rviz" args="-d $(find bringup)/rviz/kinect2_gmapping.rviz" />

</launch>- 还有在新建bringup/rviz/下新建kinect2_gmapping.rviz文件
$ cd ~/catkin_ws/bringup/rviz/
$ touch kinect2_gmapping.rviz
$ vim kinect2_gmapping.rviz- 代码如下:
Panels:
  - Class: rviz/Displays
    Help Height: 78
    Name: Displays
    Property Tree Widget:
      Expanded:
        - /Global Options1
        - /Status1
        - /Map1
      Splitter Ratio: 0.5
    Tree Height: 566
  - Class: rviz/Selection
    Name: Selection
  - Class: rviz/Tool Properties
    Expanded:
      - /2D Pose Estimate1
      - /2D Nav Goal1
      - /Publish Point1
    Name: Tool Properties
    Splitter Ratio: 0.588679
  - Class: rviz/Views
    Expanded:
      - /Current View1
    Name: Views
    Splitter Ratio: 0.5
  - Class: rviz/Time
    Experimental: false
    Name: Time
    SyncMode: 0
    SyncSource: LaserScan
Visualization Manager:
  Class: ""
  Displays:
    - Alpha: 0.5
      Cell Size: 1
      Class: rviz/Grid
      Color: 160; 160; 164
      Enabled: true
      Line Style:
        Line Width: 0.03
        Value: Lines
      Name: Grid
      Normal Cell Count: 0
      Offset:
        X: 0
        Y: 0
        Z: 0
      Plane: XY
      Plane Cell Count: 10
      Reference Frame: <Fixed Frame>
      Value: true
    - Class: rviz/TF
      Enabled: true
      Frame Timeout: 15
      Frames:
        All Enabled: true
        base_footprint:
          Value: true
        base_link:
          Value: true
        kinect2_depth_frame:
          Value: true
        kinect2_ir_optical_frame:
          Value: true
        kinect2_link:
          Value: true
        kinect2_rgb_optical_frame:
          Value: true
        laser:
          Value: true
        map:
          Value: true
        odom:
          Value: true
      Marker Scale: 1
      Name: TF
      Show Arrows: true
      Show Axes: true
      Show Names: true
      Tree:
        map:
          odom:
            base_footprint:
              base_link:
                kinect2_depth_frame:
                  {}
                kinect2_link:
                  kinect2_rgb_optical_frame:
                    kinect2_ir_optical_frame:
                      {}
                laser:
                  {}
      Update Interval: 0
      Value: true
    - Alpha: 1
      Autocompute Intensity Bounds: true
      Autocompute Value Bounds:
        Max Value: 1
        Min Value: 1
        Value: true
      Axis: Z
      Channel Name: intensity
      Class: rviz/LaserScan
      Color: 255; 255; 255
      Color Transformer: AxisColor
      Decay Time: 0
      Enabled: true
      Invert Rainbow: false
      Max Color: 255; 255; 255
      Max Intensity: 4096
      Min Color: 0; 0; 0
      Min Intensity: 0
      Name: LaserScan
      Position Transformer: XYZ
      Queue Size: 10
      Selectable: true
      Size (Pixels): 3
      Size (m): 0.01
      Style: Flat Squares
      Topic: /scan
      Unreliable: false
      Use Fixed Frame: true
      Use rainbow: true
      Value: true
    - Alpha: 0.7
      Class: rviz/Map
      Color Scheme: map
      Draw Behind: false
      Enabled: true
      Name: Map
      Topic: /map
      Unreliable: false
      Value: true
  Enabled: true
  Global Options:
    Background Color: 48; 48; 48
    Fixed Frame: odom
    Frame Rate: 30
  Name: root
  Tools:
    - Class: rviz/Interact
      Hide Inactive Objects: true
    - Class: rviz/MoveCamera
    - Class: rviz/Select
    - Class: rviz/FocusCamera
    - Class: rviz/Measure
    - Class: rviz/SetInitialPose
      Topic: /initialpose
    - Class: rviz/SetGoal
      Topic: /move_base_simple/goal
    - Class: rviz/PublishPoint
      Single click: true
      Topic: /clicked_point
  Value: true
  Views:
    Current:
      Class: rviz/Orbit
      Distance: 70.1093
      Enable Stereo Rendering:
        Stereo Eye Separation: 0.06
        Stereo Focal Distance: 1
        Swap Stereo Eyes: false
        Value: false
      Focal Point:
        X: 3.9777
        Y: -3.7323
        Z: -7.60875
      Name: Current View
      Near Clip Distance: 0.01
      Pitch: 0.355398
      Target Frame: <Fixed Frame>
      Value: Orbit (rviz)
      Yaw: 0.0404091
    Saved: ~
Window Geometry:
  Displays:
    collapsed: false
  Height: 846
  Hide Left Dock: false
  Hide Right Dock: true
  QMainWindow State: 000000ff00000000fd00000004000000000000016a000002c4fc0200000008fb0000001200530065006c0065006300740069006f006e00000001e10000009b0000006100fffffffb0000001e0054006f006f006c002000500072006f007000650072007400690065007302000001ed000001df00000185000000a3fb000000120056006900650077007300200054006f006f02000001df000002110000018500000122fb000000200054006f006f006c002000500072006f0070006500720074006900650073003203000002880000011d000002210000017afb000000100044006900730070006c0061007900730100000028000002c4000000d600fffffffb0000002000730065006c0065006300740069006f006e00200062007500660066006500720200000138000000aa0000023a00000294fb00000014005700690064006500530074006500720065006f02000000e6000000d2000003ee0000030bfb0000000c004b0069006e0065006300740200000186000001060000030c00000261000000010000010f000002c4fc0200000003fb0000001e0054006f006f006c002000500072006f00700065007200740069006500730100000041000000780000000000000000fb0000000a005600690065007700730000000028000002c4000000ac00fffffffb0000001200530065006c0065006300740069006f006e010000025a000000b200000000000000000000000200000490000000a9fc0100000001fb0000000a00560069006500770073030000004e00000080000002e10000019700000003000004b00000003efc0100000002fb0000000800540069006d00650100000000000004b0000002f600fffffffb0000000800540069006d0065010000000000000450000000000000000000000340000002c400000004000000040000000800000008fc0000000100000002000000010000000a0054006f006f006c00730100000000ffffffff0000000000000000
  Selection:
    collapsed: false
  Time:
    collapsed: false
  Tool Properties:
    collapsed: false
  Views:
    collapsed: true
  Width: 1200
  X: 50
Y: 45- 最后我们依次启动我们的launch文件便可
$ roslaunch kinect2_gmapping.launch
$ roslaunch kinect2_gmapping_rviz_view.launch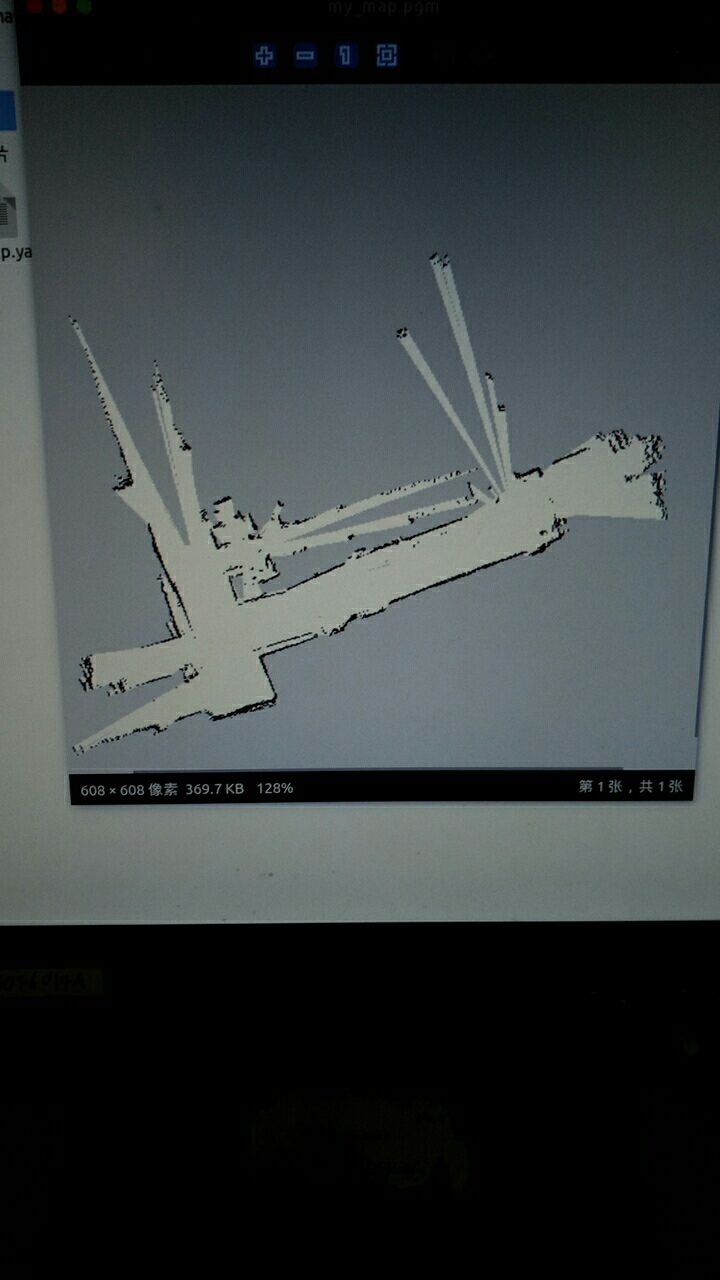
$ rosrun teleop_twist_keyboard teleop_twist_keyboard.py- 这样子我们就可以愉快的控制小车移动来建图了,当你建好图后运行一下指令就可以保存地图:
rosrun map_server map_saver -f mymap-
地图保存在主文件夹,两个文件,mymap.pgm 和 mymap.yaml
-
效果:
-
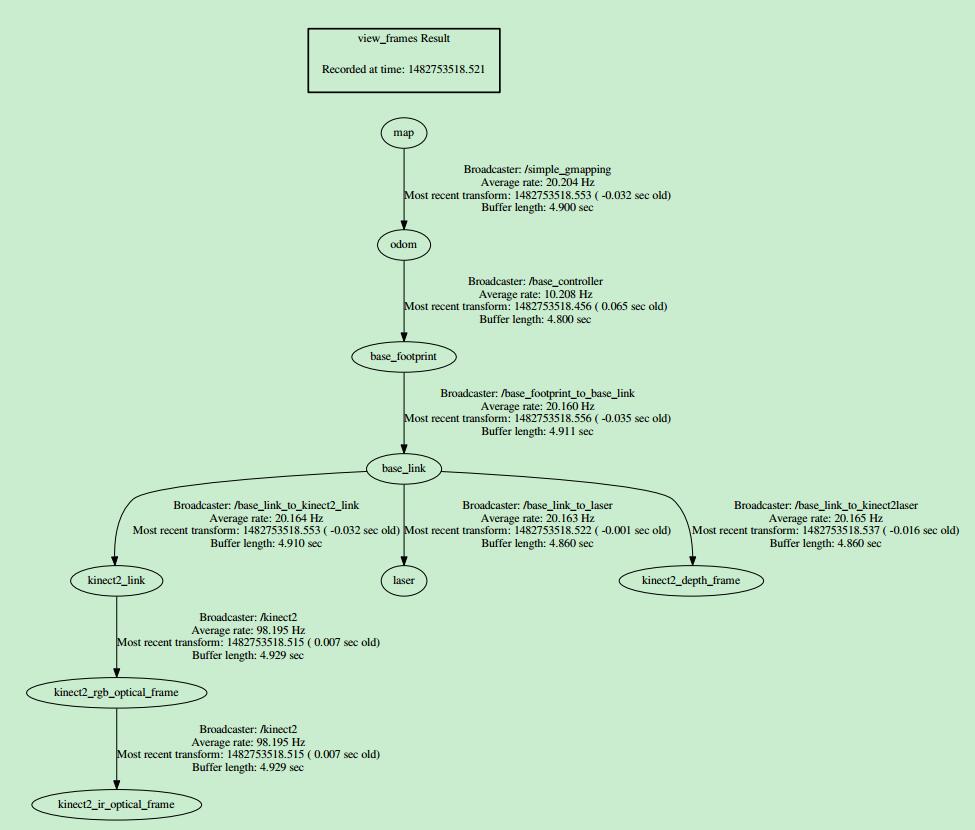
TF树:
$ cd ~
$ rosrun tf view_frames- 效果:
纠错,疑问,交流: 请进入讨论区或 请点击进入页面,扫码加入微信群或Q群进行交流
获取最新文章: 扫一扫加入“创客智造”公众号