


ROS与web入门教程-控制turtlesim移动
纠错,疑问,交流: 请进入讨论区或 请点击进入页面,扫码加入微信群或Q群进行交流
获取最新文章: 扫一扫加入“创客智造”公众号
ROS与web入门教程-控制turtlesim移动
说明:
- 介绍通过页面控制turtlesim移动
步骤:
- 增加新的模板turtlesim.php
cd /home/ubuntu/web/cms/templates/Pages
cp ros.php turtlesim.php- 更改内容为:
<?php
/**
 * CakePHP(tm) : Rapid Development Framework (https://cakephp.org)
 * Copyright (c) Cake Software Foundation, Inc. (https://cakefoundation.org)
 *
 * Licensed under The MIT License
 * For full copyright and license information, please see the LICENSE.txt
 * Redistributions of files must retain the above copyright notice.
 *
 * @copyright Copyright (c) Cake Software Foundation, Inc. (https://cakefoundation.org)
 * @link      https://cakephp.org CakePHP(tm) Project
 * @since     0.10.0
 * @license   https://opensource.org/licenses/mit-license.php MIT License
 * @var \App\View\AppView $this
 */
use Cake\Cache\Cache;
use Cake\Core\Configure;
use Cake\Core\Plugin;
use Cake\Datasource\ConnectionManager;
use Cake\Error\Debugger;
use Cake\Http\Exception\NotFoundException;

$this->disableAutoLayout();

?>
<!DOCTYPE html>
<html>

<head>
    <meta charset="utf-8" />
    <?= $this->Html->script('https://static.robotwebtools.org/EventEmitter2/current/eventemitter2.min.js') ?>
    <?= $this->Html->script('roslib.js') ?>
    <?= $this->fetch('script') ?>
    <script>
    // Connecting to ROS
    // -----------------
    var ros = new ROSLIB.Ros();

    // If there is an error on the backend, an 'error' emit will be emitted.
    ros.on('error', function(error) {
        document.getElementById('connecting').style.display = 'none';
        document.getElementById('connected').style.display = 'none';
        document.getElementById('closed').style.display = 'none';
        document.getElementById('error').style.display = 'inline';
        console.log(error);
    });

    // Find out exactly when we made a connection.
    ros.on('connection', function() {
        console.log('Connection made!');
        document.getElementById('connecting').style.display = 'none';
        document.getElementById('error').style.display = 'none';
        document.getElementById('closed').style.display = 'none';
        document.getElementById('connected').style.display = 'inline';
    });

    ros.on('close', function() {
        console.log('Connection closed.');
        document.getElementById('connecting').style.display = 'none';
        document.getElementById('connected').style.display = 'none';
        document.getElementById('closed').style.display = 'inline';
    });

    // Create a connection to the rosbridge WebSocket server.
    ros.connect('ws://192.168.0.139:9090');

    // Publishing a Topic
    // ------------------

    // First, we create a Topic object with details of the topic's name and message type.
    var cmdVel = new ROSLIB.Topic({
        ros: ros,
        name: '/turtle1/cmd_vel',
        messageType: 'geometry_msgs/Twist'
    });

    // Then we create the payload to be published. The object we pass in to ros.Message matches the
    // fields defined in the geometry_msgs/Twist.msg definition.
    var twist = new ROSLIB.Message({
        linear: {
            x: 0.1,
            y: 0.2,
            z: 0.3
        },
        angular: {
            x: -0.1,
            y: -0.2,
            z: -0.3
        }
    });

    // And finally, publish.
    //cmdVel.publish(twist);

    //Subscribing to a Topic
    //----------------------

    // Like when publishing a topic, we first create a Topic object with details of the topic's name
    // and message type. Note that we can call publish or subscribe on the same topic object.
    var listener = new ROSLIB.Topic({
        ros: ros,
        name: '/chatter',
        messageType: 'std_msgs/String'
    });

    // Calling a service
    // -----------------

    // First, we create a Service client with details of the service's name and service type.
    var addTwoIntsClient = new ROSLIB.Service({
        ros: ros,
        name: '/add_two_ints',
        serviceType: 'rospy_tutorials/AddTwoInts'
    });

    // Then we create a Service Request. The object we pass in to ROSLIB.ServiceRequest matches the
    // fields defined in the rospy_tutorials AddTwoInts.srv file.
    var request = new ROSLIB.ServiceRequest({
        a: 1,
        b: 2
    });

    // Finally, we call the /add_two_ints service and get back the results in the callback. The result
    // is a ROSLIB.ServiceResponse object.
    addTwoIntsClient.callService(request, function(result) {
        console.log('Result for service call on ' + addTwoIntsClient.name + ': ' + result.sum);
    });

    // Advertising a Service
    // ---------------------

    // The Service object does double duty for both calling and advertising services
    var setBoolServer = new ROSLIB.Service({
        ros: ros,
        name: '/set_bool',
        serviceType: 'std_srvs/SetBool'
    });

    // Use the advertise() method to indicate that we want to provide this service
    setBoolServer.advertise(function(request, response) {
        console.log('Received service request on ' + setBoolServer.name + ': ' + request.data);
        response['success'] = true;
        response['message'] = 'Set successfully';
        return true;
    });

    // Setting a param value
    // ---------------------

    ros.getParams(function(params) {
        console.log(params);
    });

    // First, we create a Param object with the name of the param.
    var maxVelX = new ROSLIB.Param({
        ros: ros,
        name: 'max_vel_y'
    });

    //Then we set the value of the param, which is sent to the ROS Parameter Server.
    maxVelX.set(0.8);
    maxVelX.get(function(value) {
        console.log('MAX VAL: ' + value);
    });

    // Getting a param value
    // ---------------------

    var favoriteColor = new ROSLIB.Param({
        ros: ros,
        name: 'favorite_color'
    });

    favoriteColor.set('red');
    favoriteColor.get(function(value) {
        console.log('My robot\'s favorite color is ' + value);
    });


    function publish()//在点击”Publish”按钮后发布消息,并对消息进行更改
    {
        cmdVel.publish(twist);//发布twist消息
        twist.linear.x = twist.linear.x + 0.1;
        twist.linear.y = twist.linear.y + 0.1;
        twist.linear.z = twist.linear.z + 0.1;
        twist.angular.x = twist.angular.x + 0.1;
        twist.angular.y = twist.angular.y + 0.1;
        twist.angular.z = twist.angular.z + 0.1;
    }

    function subscribe()//在点击”Subscribe”按钮后订阅'/chatter'的消息,并将其显示到网页中
    {
        listener.subscribe(function(message) {
            console.log('Received message on ' + listener.name + ': ' + message.data);
            document.getElementById("output").innerHTML = ('Received message on ' + listener.name + ': ' + message.data);
        });
    }

    function unsubscribe()//在点击”Unsubscribe”按钮后取消订阅'/chatter'的消息
    {
        // If desired, we can unsubscribe from the topic as well.
        listener.unsubscribe();
    }

    </script>
</head>

<body>
    <h1>Simple roslib Example</h1>
    <p>Run the following commands in the terminal then refresh this page. Check the JavaScript console for the output.
    </p>
    <ol>
        <li><tt>roscore</tt></li>
        <li><tt>rostopic pub /listener std_msgs/String "Hello, World"</tt></li>
        <li><tt>rostopic echo /cmd_vel</tt></li>
        <li><tt>rosrun rospy_tutorials add_two_ints_server</tt></li>
        <li><tt>roslaunch rosbridge_server rosbridge_websocket.launch</tt></li>
    </ol>
    <div id="statusIndicator">
        <p id="connecting">
            Connecting to rosbridge...
        </p>
        <p id="connected" style="color:#00D600; display:none">
            Connected
        </p>
        <p id="error" style="color:#FF0000; display:none">
            Error in the backend!
        </p>
        <p id="closed" style="display:none">
            Connection closed.
        </p>
    </div>
    <p id = "output"></p>
    <button onclick = "publish()">Publish</button>
    <button onclick = "subscribe()">Subscribe</button>
    <button onclick = "unsubscribe()">Unsubscribe</button><br />
</body>

</html>- 增加了按钮pulish,发送速度命令给话题
- 增加了按钮subscribe,监听chatter话题,并输出到页面和输出到console
- 增加了按钮unsubscribe,取消监听
测试:
- 运行rosbridge_server
roslaunch rosbridge_server rosbridge_websocket.launch- 运行turtlesim
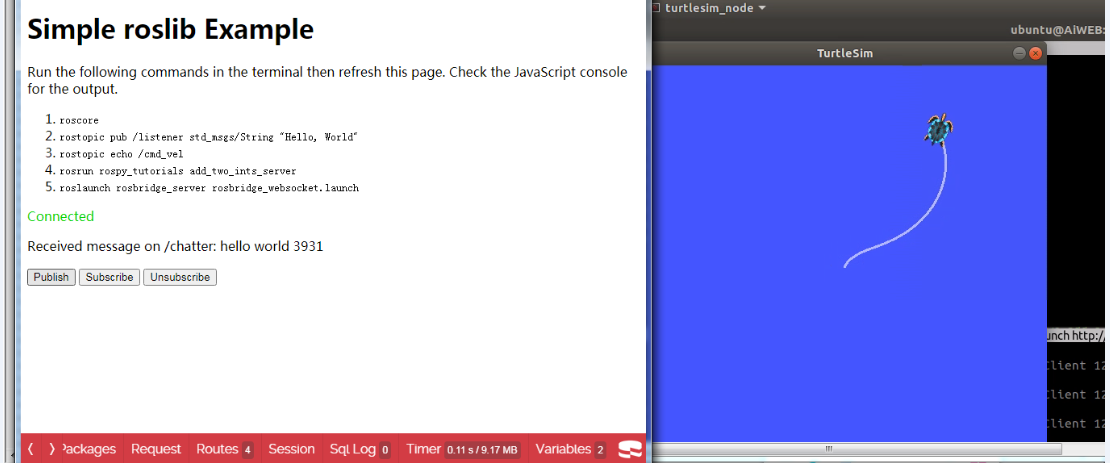
rosrun turtlesim turtlesim_node- 打开页面 http://192.168.0.139/pages/turtlesim
- 点击pushlish按钮,小乌龟开始移动
- 效果如下:
- 运行talker程序
rosrun roscpp_tutorials talker- 点击subscribe按钮,页面显示订阅的话题内容,console上也显示话题内容
- 效果如下:

纠错,疑问,交流: 请进入讨论区或 请点击进入页面,扫码加入微信群或Q群进行交流
获取最新文章: 扫一扫加入“创客智造”公众号