


Arduino内置教程-USB-鼠标摇杆控制
纠错,疑问,交流: 请进入讨论区或 请点击进入页面,扫码加入微信群或Q群进行交流
获取最新文章: 扫一扫加入“创客智造”公众号
鼠标摇杆控制
-
用鼠标函数库,你可以用Arduino Leonardo, Micro, or Due控制一个电脑屏幕上的光标。这个例子示范了用一个按键来打开和关闭鼠标摇杆控制。
-
Arduino的光标移动是相关联的。每次读到输入时,光标的位置就会根据它当前位置更新。
-
两个模拟输入(范围从0到1023)被转换成-12到12。这个程序假设操纵杆的静息值在这个范围的中心,但有一个阈值。
-
按键允许你切换鼠标控制打开和关闭。作为一个选项,你可以连接一个状态LED灯到pin5,当Arduino控制鼠标时,LED灯点亮。第二个按键(要通过一个10k ohm电阻下拉到地)连接到D3,来作为鼠标的左键点击。
-
注意:当你用Mouse.move()命令时,Arduino会接管你的电脑键盘!为了确保你没有失去对电脑的控制同时运行这个函数,确定在你调用Mouse.move()前,启动一个可靠的控制系统。这个程序包括一个按键切换鼠标控制状态,所以你可以打开和关闭鼠标控制。
硬件要求
- Arduino Leonardo, Micro, or Due开发板
- 2 轴操纵杆
- 即时按键(和摇杆是一起的)
- LED
- 220 ohm 电阻
- 10k ohm 电阻(如果需要下拉)
电路
- 用micro-USB线连接你的Leonardo开发板到你的电脑。连接按键到pin6。如果你用的那部分像下面画的摇杆的按键,你可能不用下拉电阻。摇杆的x轴连接到模拟引脚A0,y轴连接到A1。
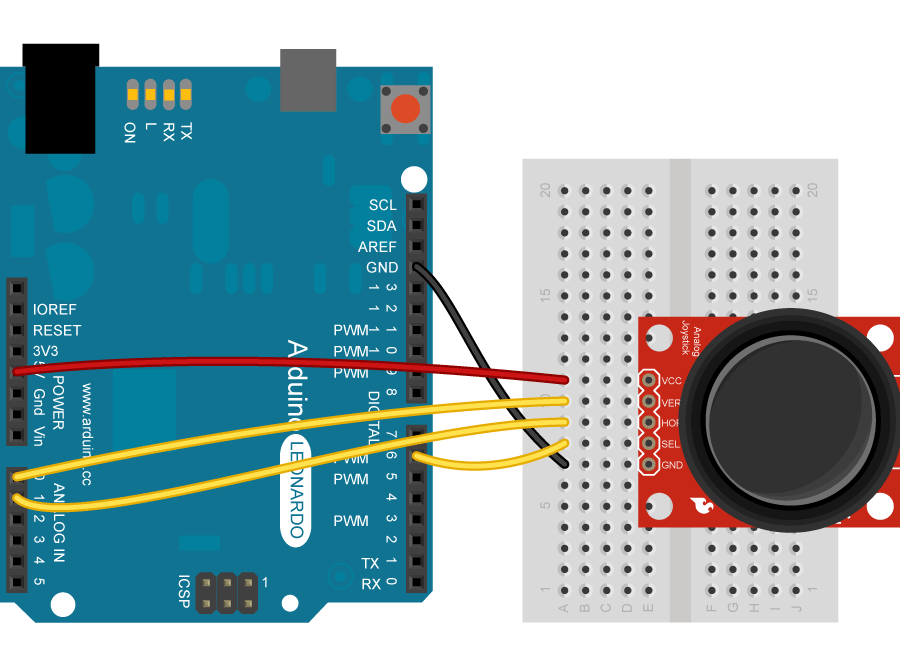 图由 Fritzing 软件绘制
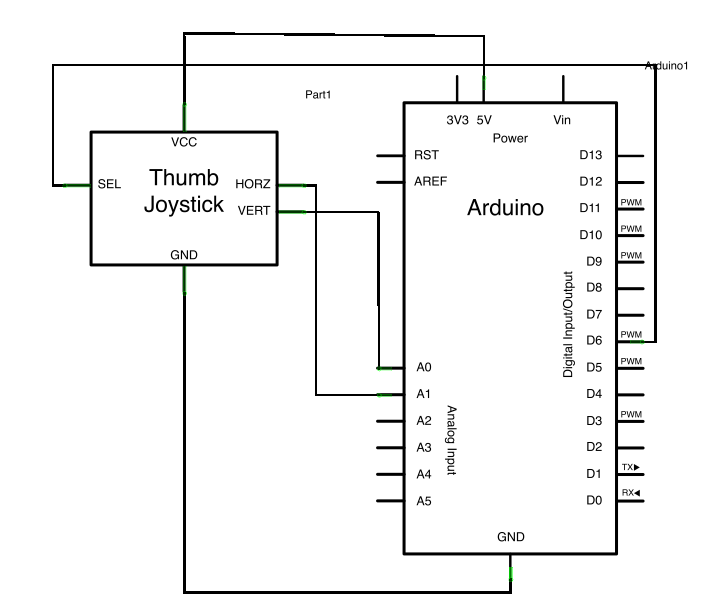
原理图
样例代码
/*
  JoystickMouseControl

 Controls the mouse from a joystick on an Arduino Leonardo, Micro or Due.
 Uses a pushbutton to turn on and off mouse control, and
 a second pushbutton to click the left mouse button

 Hardware:
 * 2-axis joystick connected to pins A0 and A1
 * pushbuttons connected to pin D2 and D3

 The mouse movement is always relative. This sketch reads
 two analog inputs that range from 0 to 1023 (or less on either end)
 and translates them into ranges of -6 to 6.
 The sketch assumes that the joystick resting values are around the
 middle of the range, but that they vary within a threshold.

 WARNING:  When you use the Mouse.move() command, the Arduino takes
 over your mouse!  Make sure you have control before you use the command.
 This sketch includes a pushbutton to toggle the mouse control state, so
 you can turn on and off mouse control.

 created 15 Sept 2011
 updated 28 Mar 2012
 by Tom Igoe

 this code is in the public domain

 */

#include "Mouse.h"

// set pin numbers for switch, joystick axes, and LED:
const int switchPin = 2;      // switch to turn on and off mouse control
const int mouseButton = 3;    // input pin for the mouse pushButton
const int xAxis = A0;         // joystick X axis
const int yAxis = A1;         // joystick Y axis
const int ledPin = 5;         // Mouse control LED

// parameters for reading the joystick:
int range = 12;               // output range of X or Y movement
int responseDelay = 5;        // response delay of the mouse, in ms
int threshold = range / 4;    // resting threshold
int center = range / 2;       // resting position value

boolean mouseIsActive = false;    // whether or not to control the mouse
int lastSwitchState = LOW;        // previous switch state

void setup() {
  pinMode(switchPin, INPUT);       // the switch pin
  pinMode(ledPin, OUTPUT);         // the LED pin
  // take control of the mouse:
  Mouse.begin();
}

void loop() {
  // read the switch:
  int switchState = digitalRead(switchPin);
  // if it's changed and it's high, toggle the mouse state:
  if (switchState != lastSwitchState) {
    if (switchState == HIGH) {
      mouseIsActive = !mouseIsActive;
      // turn on LED to indicate mouse state:
      digitalWrite(ledPin, mouseIsActive);
    }
  }
  // save switch state for next comparison:
  lastSwitchState = switchState;

  // read and scale the two axes:
  int xReading = readAxis(A0);
  int yReading = readAxis(A1);

  // if the mouse control state is active, move the mouse:
  if (mouseIsActive) {
    Mouse.move(xReading, yReading, 0);
  }

  // read the mouse button and click or not click:
  // if the mouse button is pressed:
  if (digitalRead(mouseButton) == HIGH) {
    // if the mouse is not pressed, press it:
    if (!Mouse.isPressed(MOUSE_LEFT)) {
      Mouse.press(MOUSE_LEFT);
    }
  }
  // else the mouse button is not pressed:
  else {
    // if the mouse is pressed, release it:
    if (Mouse.isPressed(MOUSE_LEFT)) {
      Mouse.release(MOUSE_LEFT);
    }
  }

  delay(responseDelay);
}

/*
  reads an axis (0 or 1 for x or y) and scales the
 analog input range to a range from 0 to <range>
 */

int readAxis(int thisAxis) {
  // read the analog input:
  int reading = analogRead(thisAxis);

  // map the reading from the analog input range to the output range:
  reading = map(reading, 0, 1023, 0, range);

  // if the output reading is outside from the
  // rest position threshold,  use it:
  int distance = reading - center;

  if (abs(distance) < threshold) {
    distance = 0;
  }

  // return the distance for this axis:
  return distance;
}更多
- Mouse.click()
- Mouse.move()
- Mouse.press()
- Mouse.release()
- Mouse.isPressed()
- KeyboardLogout - 利用按键命令注销当前使用者
- KeyboardMessage - 当一个按键被按下,发送一个文本字符串。
- KeyboardReprogram - 在Arduino IDE上打开一个新窗口,用简单的跑马灯程序重新编译Leonardo
- KeyboardSerial - 从串口里读取一个字节,然后返回一个键值。
- KeyboardAndMouseControl - 在一个程序里示范鼠标和键盘命令
- ButtonMouseControl - 通过5个按键控制光标行动
- JoystickMouseControl - 当按键被按下时,通过一个操纵杆来控制电脑光标的行动
纠错,疑问,交流: 请进入讨论区或 请点击进入页面,扫码加入微信群或Q群进行交流
获取最新文章: 扫一扫加入“创客智造”公众号