


Ailibot仿真入门教程-用gazebo插件生成可导航的场景地图
纠错,疑问,交流: 请进入讨论区或 请点击进入页面,扫码加入微信群或Q群进行交流
获取最新文章: 扫一扫加入“创客智造”公众号
文章说明
- 本教程主要介绍如果使用gazebo插件生成可导航的场景地图
- 测试环境: Ubuntu 20.04 + Gazebo 11 + collision_map_creator_plugin插件
操作步骤
- 此处使用本站便利ROS代码部署工具RCM,安装方法
curl https://www.ncnynl.com/rcm.sh | bash -- 利用RCM部署代码,安装脚本参考
cs -s install_ros1_map_creator_plugin测试
使用插件包中自带的world场景测试
- 加载场景
$ export GAZEBO_PLUGIN_PATH=$GAZEBO_PLUGIN_PATH:~/tools/collision_map_creator_plugin/build
$ gazebo ~/tools/collision_map_creator_plugin/world/simple.world --verbose
Gazebo multi-robot simulator, version 11.11.0
Copyright (C) 2012 Open Source Robotics Foundation.
Released under the Apache 2 License.
http://gazebosim.org

[Msg] Waiting for master.
Gazebo multi-robot simulator, version 11.11.0
Copyright (C) 2012 Open Source Robotics Foundation.
Released under the Apache 2 License.
http://gazebosim.org

[Msg] Waiting for master.
[Msg] Connected to gazebo master @ http://127.0.0.1:11345
[Msg] Publicized address: 192.168.0.18
[Msg] Loading world file [/home/lalala/tools/collision_map_creator_plugin/world/./simple.world]
Subscribing to: ~/collision_map/command
[Msg] Connected to gazebo master @ http://127.0.0.1:11345
[Msg] Publicized address: 192.168.0.18
[Wrn] [Publisher.cc:135] Queue limit reached for topic /gazebo/default/user_camera/pose, deleting message. This warning is printed only once.
- 指定
--verbose参数,显示启动的详细信息,了解加载插件 - 新开终端,请求建图
$ export GAZEBO_PLUGIN_PATH=$GAZEBO_PLUGIN_PATH:~/tools/collision_map_creator_plugin/build
$ cd ~/tools/collision_map_creator_plugin/build
$ ./request_publisher "(-5,5)(5,5)(5,-5)(-5,-5)" 0.1 0.05 $(pwd)/map.png 255 ground_plane::link::collision
Request:  LL.x: -5 LL.y: -3 UR.x: 4 UR.y: 5 Height: 0.1 Resolution: 0.05 Filename: /home/lalala/tools/collision_map_creator_plugin/build/map.png Threshold: 255 GroundEntityName: ground_plane::link::collision MinHeight: 0
done1done2done3-
参数说明
"(-5,5)(5,5)(5,-5)(-5,-5)"表示要建图的范围(单位:米),通常等于Gazebo中的栅格数;0.1表示垂直投影的高度;0.05地图分辨率,即每个像素代表0.01m;$(pwd)/cloister.png生成地图图片的位置和名称office_desk::link::collision被视为地面,以白色显示,其余位置以黑色(255-255=0)着色
-
查看输出的地图
$ eog ~/tools/collision_map_creator_plugin/build/map.png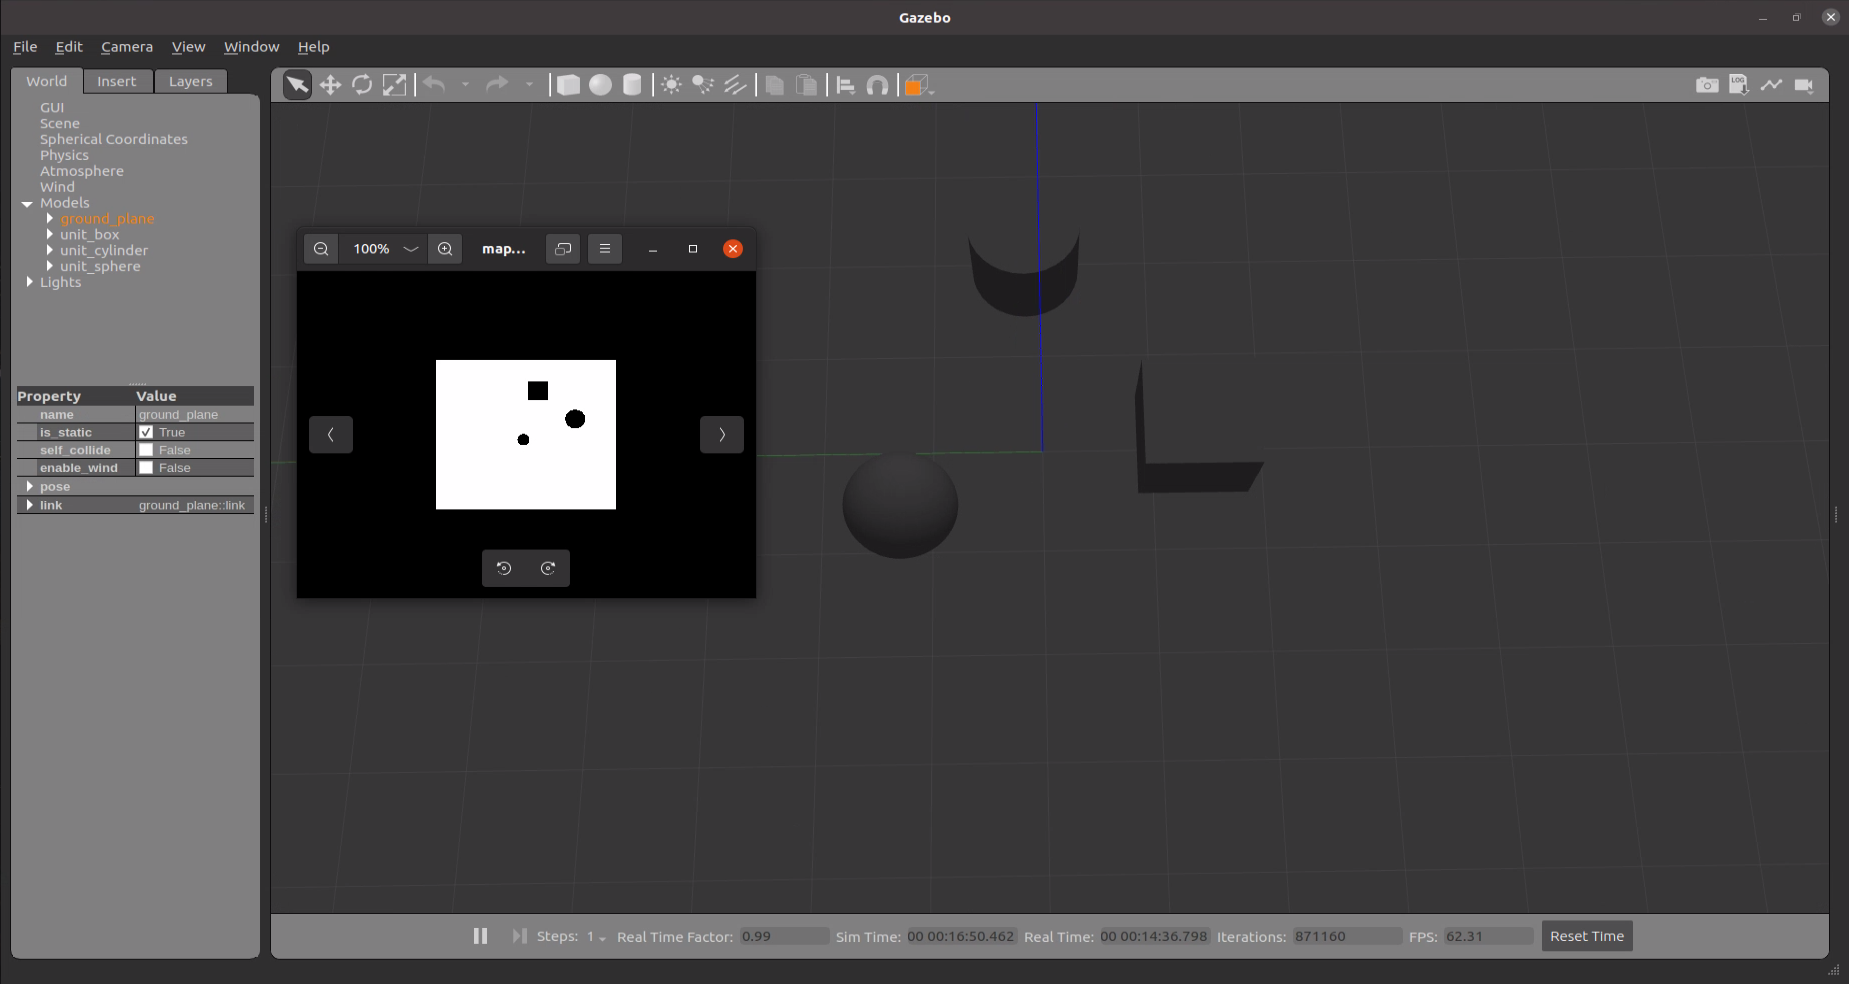
使用上一个教程设计的world场景进行测试
- 在world文件中尾部添加插件
$ rosed ailibot_gazebo test.world
  ...
    <plugin filename="libcollision_map_creator.so" name="collision_map_creator"/>
  </world>
</sdf>- 加载场景
$ export GAZEBO_PLUGIN_PATH=$GAZEBO_PLUGIN_PATH:~/tools/collision_map_creator_plugin/build
$ roscd ailibot_gazebo/worlds
$ gazebo test.world --verbose- 创建地图
$ export GAZEBO_PLUGIN_PATH=$GAZEBO_PLUGIN_PATH:~/tools/collision_map_creator_plugin/build
$ cd ~/tools/collision_map_creator_plugin/build
$ ./request_publisher "(-5,5)(5,5)(5,-5)(-5,-5)" 0.1 0.05 $(pwd)/map.png 255 ground_plane::link::collision- 如果需要在rviz上的加载这个地图,则需要翻转地图才跟gazebo的地图进行匹配,否则rviz上的小车方向是反的
- 翻转地图同时查看输出的地图
$ sudo apt install imagemagick
$ convert map.png -flip map_flip.png
$ eog ~/tools/collision_map_creator_plugin/build/map.png
- 创建一个地图对应的yaml文件
$ vim map_flip.yaml
image: map_flip.png
resolution: 0.050000
origin: [-5.000000, -5.000000, 0.000000]
negate: 0
occupied_thresh: 0.65
free_thresh: 0.196
参考资料
纠错,疑问,交流: 请进入讨论区或 请点击进入页面,扫码加入微信群或Q群进行交流
获取最新文章: 扫一扫加入“创客智造”公众号