


ros2与webots入门教程-创建自定义 Python 插件
纠错,疑问,交流: 请进入讨论区或 请点击进入页面,扫码加入微信群或Q群进行交流
获取最新文章: 扫一扫加入“创客智造”公众号
ros2与webots入门教程-创建自定义Python 插件
说明:
- 介绍创建自定义Python 插件
- 由于 webots_ros2 1.1.1 可以使用 webots_ros2_driver 包创建 Python 插件。
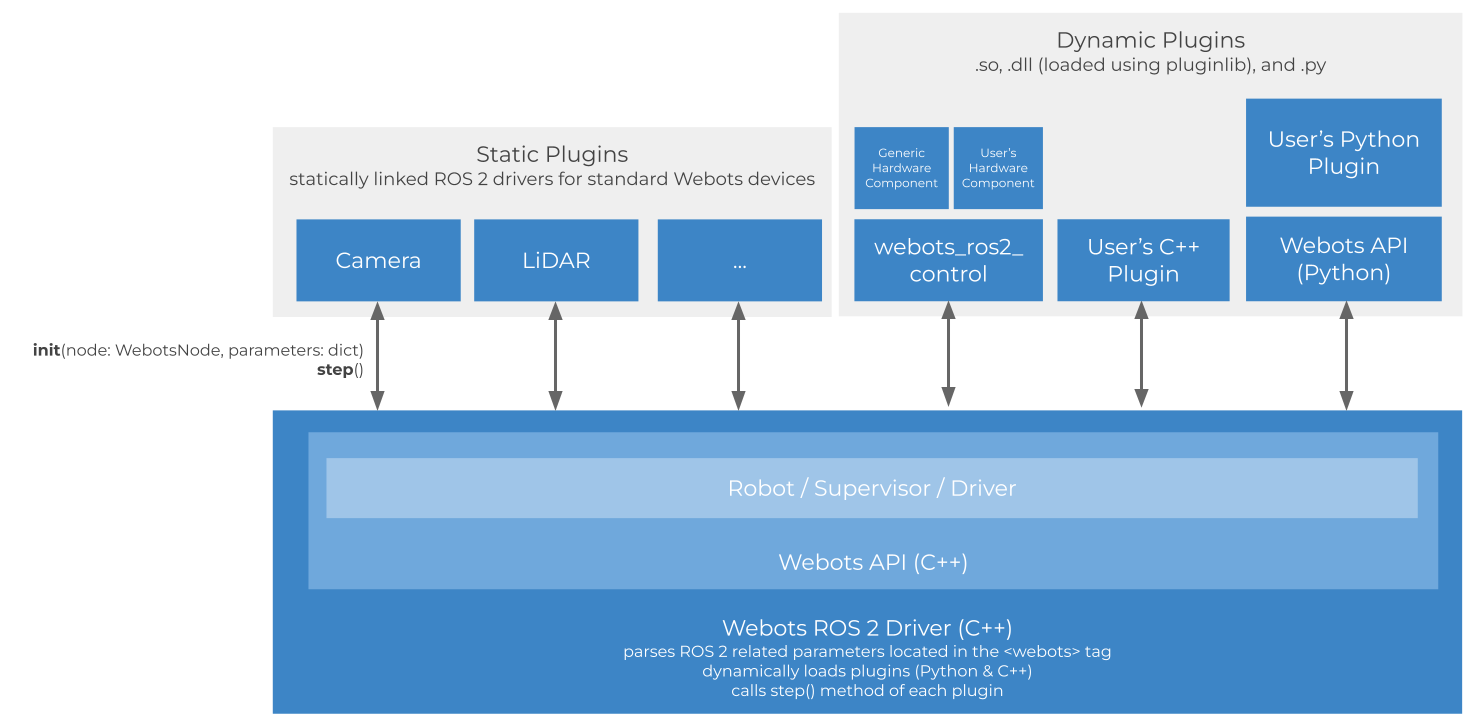
webots_ros2_driver 架构
- 请查看下图以更好地了解插件系统架构。
插件文件结构
- 该插件应保存在包的 Python 模块下。 例如:
.
├── package_name_example
│   ├── __init__.py
│   └── plugin_example.py
├── resource
│   ├── package_name_example
│   └── your_robot_description.urdf
├── package.xml
└── setup.py- package_name_example/plugin_example.py 文件,请参阅插件文件部分。
- your_robot_description.urdf 文件,请参阅在 URDF 文件中注册插件部分。
插件文件
- 一个简单的插件plugin_example.py 发布时间可以实现如下:
from rosgraph_msgs.msg import Clock
import rclpy


class PluginExample:
    # The init method is called only once the driver is initialized.
    # You will always get two arguments in the init method.
    # - The webots_node argument contains a reference on a Supervisor instance.
    # - The properties argument is a dictionary created from the XML tags.
    def init(self, webots_node, properties):
        # Unfortunately, we cannot get an instance of the parent ROS node.
        # However, we can create a new one.
        rclpy.init(args=None)
        self.__node = rclpy.create_node('plugin_node_example')

        # This will print the parameter from the URDF file.
        #
        #     { 'parameterExample': 'someValue' }
        #
        self.__node.get_logger().info('  - properties: ' + str(properties))

        # The robot property allows you to access the standard Webots API.
        # See: https://cyberbotics.com/doc/reference/robot
        self.__robot = webots_node.robot
        self.__node.get_logger().info('  - robot name: ' + str(self.__robot.getName()))
        self.__node.get_logger().info('  - basic timestep: ' + str(int(self.__robot.getBasicTimeStep())))

        # The robot property allows you to access the Supervisor Webots API
        # only if the robot is a Supervisor.
        # The function "self.__robot.getSupervisor()" will return "true" in case the robot is a Supervisor.
        # See: https://cyberbotics.com/doc/reference/supervisor
        self.__node.get_logger().info('  - is supervisor? ' + str(self.__robot.getSupervisor()))

        # The robot property also allows you to access the Driver Webots API
        # in case the robot is based on a Car.
        # See: https://cyberbotics.com/doc/automobile/driver-library

        # Create a simple publisher, subscriber and "Clock" variable.
        self.__node.create_subscription(Clock, 'clock', self.__clock_callback, 1)
        self.__publisher = self.__node.create_publisher(Clock, 'custom_clock', 1)
        self.__clock = Clock()

    def __clock_callback(self, msg):
        self.__clock = msg

    # The step method is called at every step.
    def step(self):
        # The self.__node has to be spinned once in order to execute callback functions.
        rclpy.spin_once(self.__node, timeout_sec=0)

        self.__publisher.publish(self.__clock)
在 URDF 文件中注册插件
- 然后,在机器人描述文件(例如 your_robot_description.urdf)中,在
标签下,您应该包含以下插件:
<?xml version="1.0" ?>
<robot name="Your Robot">
    <webots>
        <plugin type="package_name_example.plugin_example.PluginExample">
            <parameterExample>someValue</parameterExample>
        </plugin>
    </webots>
</robot>纠错,疑问,交流: 请进入讨论区或 请点击进入页面,扫码加入微信群或Q群进行交流
获取最新文章: 扫一扫加入“创客智造”公众号