


Arduino库教程-Ethernet-UDP Ntp Client
Network Time Protocol (NTP) Client(网络时间协议(NTP)客户端)
- 在这个例子中,你将用你的以太网shield和Arduino来查询网络时间协议(NTP)服务器。这样,你的Arduino可以从互联网上获取时间。
硬件要求
- Arduino 或者 Genuino 开发板
- Arduino Ethernet Shield
电路
以太网shield可以让你通过SPI总线连接一个 Wiznet 以太网控制器到Arduino或者genuino开发板板。它使用SPI总线连接的引脚pin 10,11,12,和13,到Wiznet。以太网shield后来的模块也有一个SD卡在板上。数字引脚 pin 4 用来控制SD卡上的从选择引脚(slave select pin)。
shield应该连接到一个有以太网电缆的网络。您将需要更改程序中的网络设置来对应于您的网络。
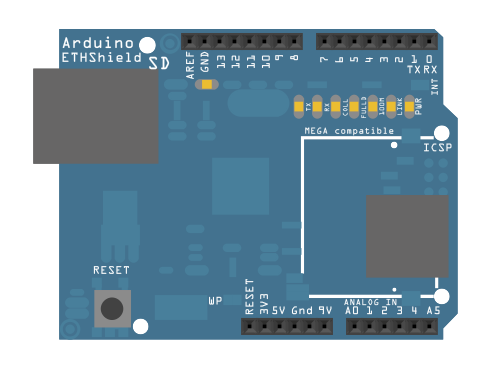
图由 Fritzing 软件绘制
在上面的图片里,Arduino或genuino开发板会堆叠在以太网shield下面。
原理图

样例代码
/*

 Udp NTP Client

 Get the time from a Network Time Protocol (NTP) time server
 Demonstrates use of UDP sendPacket and ReceivePacket
 For more on NTP time servers and the messages needed to communicate with them,
 see http://en.wikipedia.org/wiki/Network_Time_Protocol

 created 4 Sep 2010
 by Michael Margolis
 modified 9 Apr 2012
 by Tom Igoe
 modified 02 Sept 2015
 by Arturo Guadalupi

 This code is in the public domain.

 */

#include <SPI.h>
#include <Ethernet.h>
#include <EthernetUdp.h>

// Enter a MAC address for your controller below.
// Newer Ethernet shields have a MAC address printed on a sticker on the shield
byte mac[] = {
  0xDE, 0xAD, 0xBE, 0xEF, 0xFE, 0xED
};

unsigned int localPort = 8888;       // local port to listen for UDP packets

char timeServer[] = "time.nist.gov"; // time.nist.gov NTP server

const int NTP_PACKET_SIZE = 48; // NTP time stamp is in the first 48 bytes of the message

byte packetBuffer[ NTP_PACKET_SIZE]; //buffer to hold incoming and outgoing packets

// A UDP instance to let us send and receive packets over UDP
EthernetUDP Udp;

void setup() {
  // Open serial communications and wait for port to open:
  Serial.begin(9600);
  while (!Serial) {
    ; // wait for serial port to connect. Needed for native USB port only
  }


  // start Ethernet and UDP
  if (Ethernet.begin(mac) == 0) {
    Serial.println("Failed to configure Ethernet using DHCP");
    // no point in carrying on, so do nothing forevermore:
    for (;;)
      ;
  }
  Udp.begin(localPort);
}

void loop() {
  sendNTPpacket(timeServer); // send an NTP packet to a time server

  // wait to see if a reply is available
  delay(1000);
  if (Udp.parsePacket()) {
    // We've received a packet, read the data from it
    Udp.read(packetBuffer, NTP_PACKET_SIZE); // read the packet into the buffer

    // the timestamp starts at byte 40 of the received packet and is four bytes,
    // or two words, long. First, extract the two words:

    unsigned long highWord = word(packetBuffer[40], packetBuffer[41]);
    unsigned long lowWord = word(packetBuffer[42], packetBuffer[43]);
    // combine the four bytes (two words) into a long integer
    // this is NTP time (seconds since Jan 1 1900):
    unsigned long secsSince1900 = highWord << 16 | lowWord;
    Serial.print("Seconds since Jan 1 1900 = ");
    Serial.println(secsSince1900);

    // now convert NTP time into everyday time:
    Serial.print("Unix time = ");
    // Unix time starts on Jan 1 1970. In seconds, that's 2208988800:
    const unsigned long seventyYears = 2208988800UL;
    // subtract seventy years:
    unsigned long epoch = secsSince1900 - seventyYears;
    // print Unix time:
    Serial.println(epoch);


    // print the hour, minute and second:
    Serial.print("The UTC time is ");       // UTC is the time at Greenwich Meridian (GMT)
    Serial.print((epoch  % 86400L) / 3600); // print the hour (86400 equals secs per day)
    Serial.print(':');
    if (((epoch % 3600) / 60) < 10) {
      // In the first 10 minutes of each hour, we'll want a leading '0'
      Serial.print('0');
    }
    Serial.print((epoch  % 3600) / 60); // print the minute (3600 equals secs per minute)
    Serial.print(':');
    if ((epoch % 60) < 10) {
      // In the first 10 seconds of each minute, we'll want a leading '0'
      Serial.print('0');
    }
    Serial.println(epoch % 60); // print the second
  }
  // wait ten seconds before asking for the time again
  delay(10000);
  Ethernet.maintain();
}

// send an NTP request to the time server at the given address
void sendNTPpacket(char* address) {
  // set all bytes in the buffer to 0
  memset(packetBuffer, 0, NTP_PACKET_SIZE);
  // Initialize values needed to form NTP request
  // (see URL above for details on the packets)
  packetBuffer[0] = 0b11100011;   // LI, Version, Mode
  packetBuffer[1] = 0;     // Stratum, or type of clock
  packetBuffer[2] = 6;     // Polling Interval
  packetBuffer[3] = 0xEC;  // Peer Clock Precision
  // 8 bytes of zero for Root Delay & Root Dispersion
  packetBuffer[12]  = 49;
  packetBuffer[13]  = 0x4E;
  packetBuffer[14]  = 49;
  packetBuffer[15]  = 52;

  // all NTP fields have been given values, now
  // you can send a packet requesting a timestamp:
  Udp.beginPacket(address, 123); //NTP requests are to port 123
  Udp.write(packetBuffer, NTP_PACKET_SIZE);
  Udp.endPacket();
}
[Get Code]
更多
- Arduino Ethernet Shield – 产品描述。
- Getting started with the Ethernet Shield – 在几分钟内启动所有东西。
- Ethernet library – 以太网库的参考手册
- AdvancedChatServer - 一个服务器,用来发送所有传入的信息到所有连接的客户端(除了那个发送信息的客户端)。
- ChatServer - 一个简单的服务器,用来发送所有传入的信息到所有连接的客户端。
- WebClient – 查询网络,并通过串口监视器得到答案
- WebClientRepeating - 如何用以太网shield重复HTTP请求。
- WebServer - 一个简单的Web服务器,用来显示模拟输入的值。
- DhcpAddressPrinter – 获取DHCP地址,并打印出到串口监视器。
- DhcpChatServer – 连接到一个telnet服务器,并打印所有收到的信息到串口监视器上。用DHCP。
- TelnetClient - 连接到一个telnet服务器,并打印所有收到的信息到串口监视器上。
- BarometricPressureWebServer – 用SPI从压力传感器读取的Post数据。
- UDPSendReceiveString - 通过UDP协议(通用数据包)发送和接收文本字符串。
- UdpNtpClient - 查询一个网络时间协议(NTP)服务器,并通过串口服务器监视器获取这个信息。
获取最新文章: 扫一扫右上角的二维码加入“创客智造”公众号