


Arduino库教程-Bridge-Shell Commands
纠错,疑问,交流: 请进入讨论区或 请点击进入页面,扫码加入微信群或Q群进行交流
获取最新文章: 扫一扫加入“创客智造”公众号
Shell Commands(shell命令)
-
这个程序示范了怎样在一个 Yún 设备上运行Linux shell命令。
-
它运行在Linux processor上的wifiCheck脚本 (路径: /usr/bin/pretty-wifi-info.lua),然后用grep命令来获得信号强度。
-
在开发板上,调用parseInt()来读取WiFi信号强度(整数),并且用这个数来使LED灯渐变(用analogWrite())。
硬件要求
- Yún 开发板或者 shield
- 连接到无线网络的 Yún 设备
- 220 ohm 电阻
- LED
- 连接线
- 面包板
电路
- 在面包板上,通过一个220 ohm电阻连接一个红色LED灯到数字引脚pin9
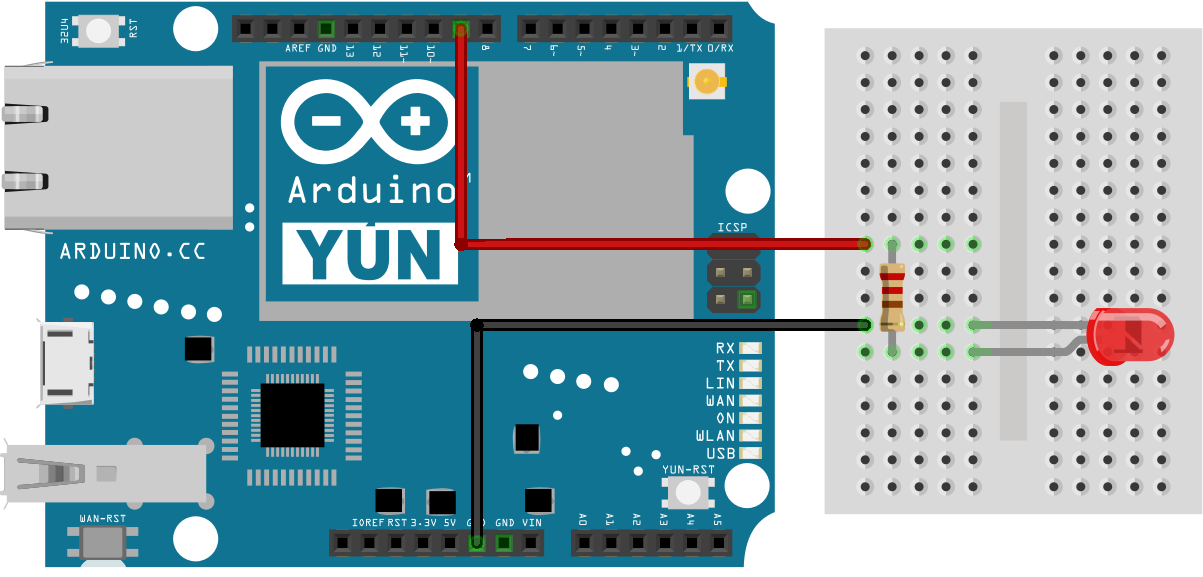 图由 Fritzing 软件绘制
原理图
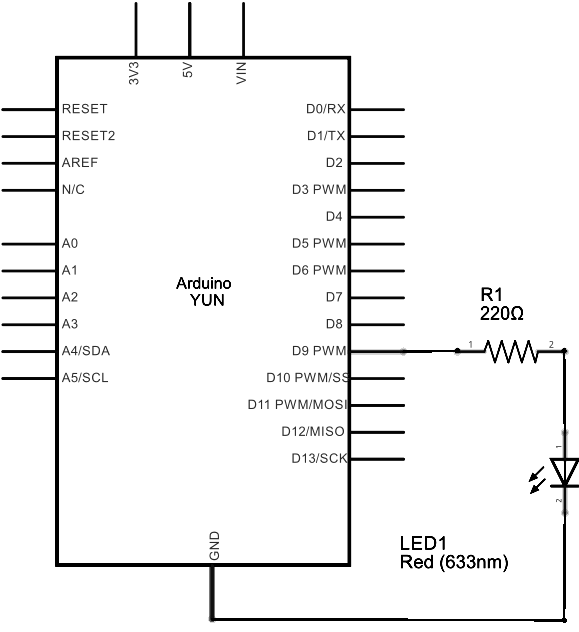 图由 Fritzing 软件绘制
样例代码
-
程序里包括Process class。
#include <Process.h> -
在setup(),初始化Bridge并开始串口连接。在运行程序其他部分之前,等待串口连接被激活。
void setup() {
  Bridge.begin();
  Serial.begin(9600);

  while (!Serial);
}- 创建一个你用来运行WiFi status程序和grep的命名好的Process。
void loop() {
Process p;- 伴随任何额外的命令,把runShellCommand()放到你想运行程序的路径。这种情况下,你可以调用 "grep Signal"来只推出WiFi连接的信号强度。
p.runShellCommand("/usr/bin/pretty-wifi-info.lua | grep Signal");- 在process结束前等待,然后你得到全部输出
while(p.running());- 一旦process结束运行,用parseInt()来寻找一个整数(表示信号强度)。它应该在0-100的范围内。用map()匹配结果到一个0-255之间的值,来适应pin 9 的LED灯的亮度(用analogWrite())。打印信号强度到串口监视器,并且在重新开始之前等待几秒钟。
while (p.available()) {
    int result = p.parseInt();
    int signal = map(result, 0, 100, 0, 255);
    analogWrite(9, signal);
    Serial.println(result);
  }
  delay(5000);
}-
LED灯应该随着WiFi信号强度波动而改变其亮度。
-
完整程序如下:
/*
  Running shell commands using Process class.

 This sketch demonstrate how to run linux shell commands
 using a Yún101/YunShield/Yún. It runs the wifiCheck script on the Linux side
 of the Yún, then uses grep to get just the signal strength line.
 Then it uses parseInt() to read the wifi signal strength as an integer,
 and finally uses that number to fade an LED using analogWrite().

 The circuit:
 * Yún101/YunShield/Yún with LED connected to pin 9

 created 12 Jun 2013
 by Cristian Maglie
 modified 25 June 2013
 by Tom Igoe

 This example code is in the public domain.

 http://www.arduino.cc/en/Tutorial/ShellCommands

 */

#include <Process.h>

void setup() {
  Bridge.begin();   // Initialize the Bridge
  SerialUSB.begin(9600);    // Initialize the Serial

  // Wait until a Serial Monitor is connected.
  while (!SerialUSB);
}

void loop() {
  Process p;
  // This command line runs the WifiStatus script, (/usr/bin/pretty-wifi-info.lua), then
  // sends the result to the grep command to look for a line containing the word
  // "Signal:"  the result is passed to this sketch:
  p.runShellCommand("/usr/bin/pretty-wifi-info.lua | grep Signal");

  // do nothing until the process finishes, so you get the whole output:
  while (p.running());

  // Read command output. runShellCommand() should have passed "Signal: xx&":
  while (p.available()) {
    int result = p.parseInt();          // look for an integer
    int signal = map(result, 0, 100, 0, 255);   // map result from 0-100 range to 0-255
    analogWrite(9, signal);         // set the brightness of LED on pin 9
    SerialUSB.println(result);          // print the number as well
  }
  delay(5000);  // wait 5 seconds before you do it again
}
[Get Code] 更多
- Bridge: 从网页浏览器进入开发板的引脚。
- Console ASCII Table: 示范了怎样打印多种格式到控制台。
- Console Pixel: 通过控制台控制一个LED灯。
- Console Read: 从控制台那里分析信息,然后重复发送返回。
- Datalogger: 在SD卡上保存传感器信息。
- File Write Script: 示范怎样在Process上写入和执行外壳脚本。
- HTTP Client: 建造一个简单的客户端,可以下载网页并且打印到串口监视器。
- HTTP Client Console: 建造一个简单的客户端,可以下载网页并且用控制台通过WIFI打印到串口监视器。
- Mailbox Read Messages: 用REST API通过一个网页发送文本信息到。
- Process: 示范怎么用Process运行 Linux 命令。
- Remote Due Blink: 示范怎么远程上传程序到DUE开发板上。
- Shell Commands: 用Process 来运行 shell 命令。
- SpacebrewYun: 在Arduino IDE软件的例子上看更多关于 Spacebrew 文档信息。
- Temboo: 在Arduino IDE软件的例子上看更多关于 Temboo 文档信息。
- Temperature Web Panel: 当浏览者要求时,粘贴传感数据到网页上。
- Time Check: 从网络的时间服务器获得时间,并且打印到串口监视器。
- WiFi Status: 运行一个预配置的脚本,报告返回当前wifi网络的强度。
- Yun First Config: 用串口监视器不费力地连接你的云产品到wifi网络,并且在上面回答一些简单的问题。
- Yun Serial Terminal: 通过串口监视器进入Linux终端。
纠错,疑问,交流: 请进入讨论区或 请点击进入页面,扫码加入微信群或Q群进行交流
获取最新文章: 扫一扫加入“创客智造”公众号