


Arduino库教程-液晶-Autoscroll
纠错,疑问,交流: 请进入讨论区或 请点击进入页面,扫码加入微信群或Q群进行交流
获取最新文章: 扫一扫加入“创客智造”公众号
autoscroll() method
-
液晶库允许你控制和日立HD44780驱动兼容的LCD显示器。他们在那里有很多显示器,你通常可以告诉他们的16针接口可以了。
-
这个例子程序展示了如何使用autoscroll()和noAutoscroll()方法来在左右移动显示屏上的所有文本。
-
每次加上一个字母,autoscroll()往左移动所有的文本一个位置。
-
noAutoscroll()轮流滚动
-
这个程序滚动打印0到9的字符,然后移动光标到右边尽头,轮流滚动,并重新打印。
硬件要求
- Arduino or Genuino Board
- LCD 显示屏 (和日立HD44780驱动兼容)
- 焊接到LCD显示屏引脚的排针
- 10k ohm 电位计
- 220 ohm 电阻
- 连接线
- 面包板
电路
-
在连接液晶显示屏到你的Arduino板之前,我们建议到焊接一组排针到LCD显示屏的连接器上(14或者16引脚数),你在上面的图可以看到。
-
液晶显示屏连接到电线板,连接引脚:
LCD RS pin to digital pin 12
LCD Enable pin to digital pin 11
LCD D4 pin to digital pin 5
LCD D5 pin to digital pin 4
LCD D6 pin to digital pin 3
LCD D7 pin to digital pin 2- 此外,连接10K电位计到+5V和GND,它的转轴(output)为LCD屏的VO引脚(pin3)。一个220欧姆的电阻是用来为显示屏的背光提供电源,通常在液晶显示器连接器的引脚15和16上。
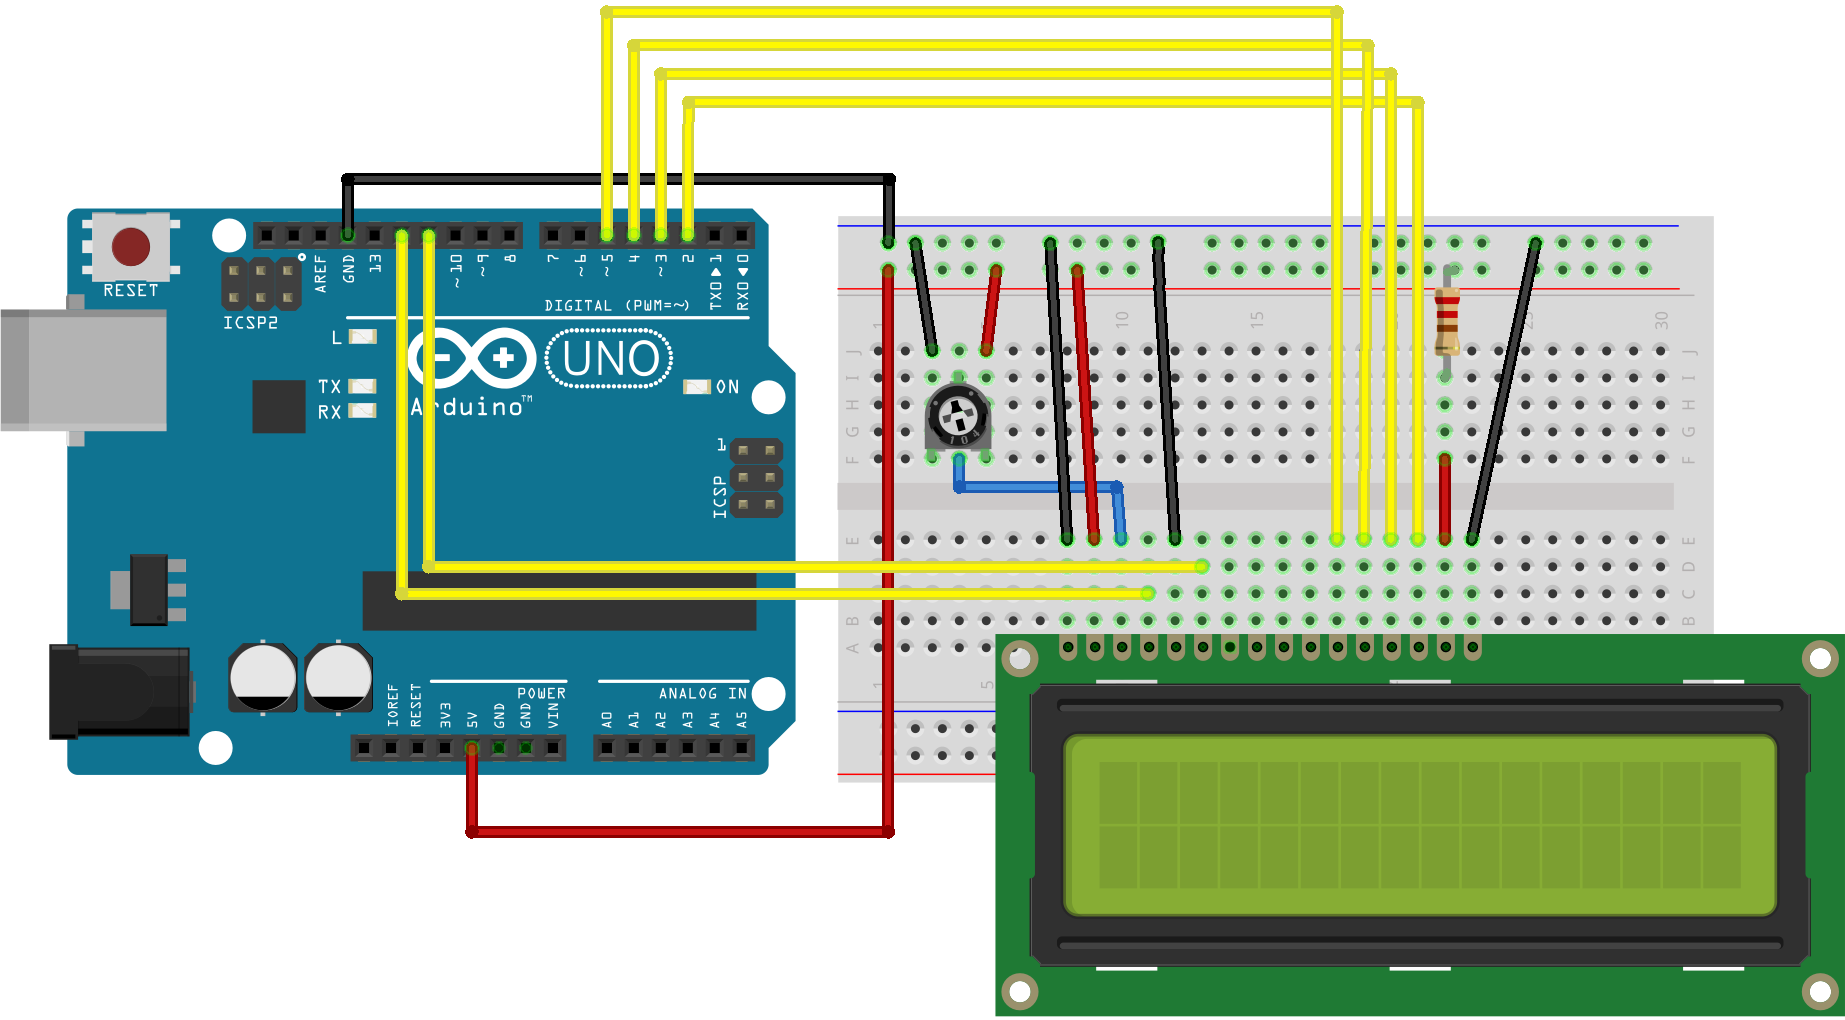 图由 Fritzing 绘制
原理图
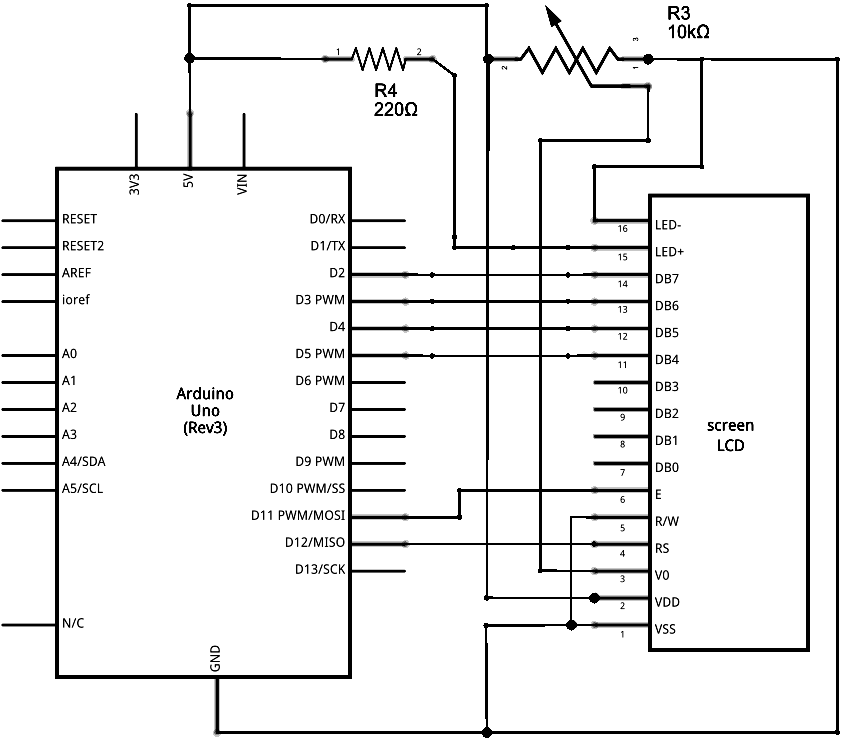 图由 Fritzing 绘制
样例代码
/*
  LiquidCrystal Library - Autoscroll

 Demonstrates the use a 16x2 LCD display.  The LiquidCrystal
 library works with all LCD displays that are compatible with the
 Hitachi HD44780 driver. There are many of them out there, and you
 can usually tell them by the 16-pin interface.

 This sketch demonstrates the use of the autoscroll()
 and noAutoscroll() functions to make new text scroll or not.

 The circuit:
 * LCD RS pin to digital pin 12
 * LCD Enable pin to digital pin 11
 * LCD D4 pin to digital pin 5
 * LCD D5 pin to digital pin 4
 * LCD D6 pin to digital pin 3
 * LCD D7 pin to digital pin 2
 * LCD R/W pin to ground
 * 10K resistor:
 * ends to +5V and ground
 * wiper to LCD VO pin (pin 3)

 Library originally added 18 Apr 2008
 by David A. Mellis
 library modified 5 Jul 2009
 by Limor Fried (http://www.ladyada.net)
 example added 9 Jul 2009
 by Tom Igoe
 modified 22 Nov 2010
 by Tom Igoe

 This example code is in the public domain.

 http://www.arduino.cc/en/Tutorial/LiquidCrystalAutoscroll

 */

// include the library code:
#include <LiquidCrystal.h>

// initialize the library with the numbers of the interface pins
LiquidCrystal lcd(12, 11, 5, 4, 3, 2);

void setup() {
  // set up the LCD's number of columns and rows:
  lcd.begin(16, 2);
}

void loop() {
  // set the cursor to (0,0):
  lcd.setCursor(0, 0);
  // print from 0 to 9:
  for (int thisChar = 0; thisChar < 10; thisChar++) {
    lcd.print(thisChar);
    delay(500);
  }

  // set the cursor to (16,1):
  lcd.setCursor(16, 1);
  // set the display to automatically scroll:
  lcd.autoscroll();
  // print from 0 to 9:
  for (int thisChar = 0; thisChar < 10; thisChar++) {
    lcd.print(thisChar);
    delay(500);
  }
  // turn off automatic scrolling
  lcd.noAutoscroll();

  // clear screen for the next loop:
  lcd.clear();
}更多
-
Liquid Crystal Library - 液晶库的参考网页
-
lcd.begin()
-
lcd.print()
-
lcd.setCursor()
-
lcd.autoscroll()
-
lcd.noAutoscroll()
-
lcd.clear()
-
for()
-
Autoscroll: 左右移动文本
-
Hello World! – 如何连接一个液晶显示器,使它工作。
-
Blink - 块状光标的控制。
-
Cursor: 线样式光标的控制。
-
Display: 迅速闪烁显示屏,而上面没有丢失任何东西。
-
TextDirection - 控制光标流出文本的方式。
-
Scroll - 左右滚动文本。
-
Serial display - 接收串口输入,并显示它。
-
SetCursor - 设置光标位置。
纠错,疑问,交流: 请进入讨论区或 请点击进入页面,扫码加入微信群或Q群进行交流
获取最新文章: 扫一扫加入“创客智造”公众号