


Arduino库教程-Ethernet-Telnet Client
纠错,疑问,交流: 请进入讨论区或 请点击进入页面,扫码加入微信群或Q群进行交流
获取最新文章: 扫一扫加入“创客智造”公众号
Telnet Client(Telnet客户端)
- 这个例子将通过以太网shield来连接一个telnet服务器。来自服务器的消息将通过串行端口打印出来。消息同样也可以发送到远程服务器。串口监视器对实现这个目的很有用处。
硬件要求
- Arduino 或者 Genuino 开发板
- Arduino Ethernet Shield
软件要求
- 一个 telnet 服务器
- 另外,Processing有一个 ChatServer 例子可以实现这个目的。
电路
-
以太网shield可以让你通过SPI总线连接一个 Wiznet 以太网控制器到Arduino或者genuino开发板板。它使用SPI总线连接的引脚pin 10,11,12,和13,到Wiznet。以太网shield后来的模块也有一个SD卡在板上。数字引脚 pin 4 用来控制SD卡上的从选择引脚(slave select pin)。
-
shield应该连接到一个有以太网电缆的网络。您将需要更改程序中的网络设置来对应于您的网络。
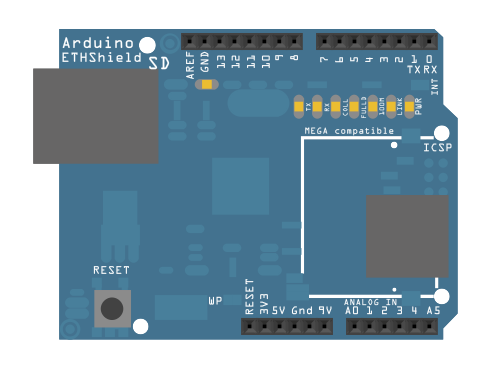 图由 Fritzing 软件绘制
在上面的图片里,Arduino或genuino开发板会堆叠在以太网shield下面。
图由 Fritzing 软件绘制
在上面的图片里,Arduino或genuino开发板会堆叠在以太网shield下面。
样例代码
/*
  Telnet client

 This sketch connects to a a telnet server (http://www.google.com)
 using an Arduino Wiznet Ethernet shield.  You'll need a telnet server
 to test this with.
 Processing's ChatServer example (part of the network library) works well,
 running on port 10002. It can be found as part of the examples
 in the Processing application, available at
 http://processing.org/

 Circuit:
 * Ethernet shield attached to pins 10, 11, 12, 13

 created 14 Sep 2010
 modified 9 Apr 2012
 by Tom Igoe

 */

#include <SPI.h>
#include <Ethernet.h>

// Enter a MAC address and IP address for your controller below.
// The IP address will be dependent on your local network:
byte mac[] = {
  0xDE, 0xAD, 0xBE, 0xEF, 0xFE, 0xED
};
IPAddress ip(192, 168, 1, 177);

// Enter the IP address of the server you're connecting to:
IPAddress server(1, 1, 1, 1);

// Initialize the Ethernet client library
// with the IP address and port of the server
// that you want to connect to (port 23 is default for telnet;
// if you're using Processing's ChatServer, use port 10002):
EthernetClient client;

void setup() {
  // start the Ethernet connection:
  Ethernet.begin(mac, ip);
  // Open serial communications and wait for port to open:
  Serial.begin(9600);
  while (!Serial) {
    ; // wait for serial port to connect. Needed for native USB port only
  }


  // give the Ethernet shield a second to initialize:
  delay(1000);
  Serial.println("connecting...");

  // if you get a connection, report back via serial:
  if (client.connect(server, 10002)) {
    Serial.println("connected");
  } else {
    // if you didn't get a connection to the server:
    Serial.println("connection failed");
  }
}

void loop() {
  // if there are incoming bytes available
  // from the server, read them and print them:
  if (client.available()) {
    char c = client.read();
    Serial.print(c);
  }

  // as long as there are bytes in the serial queue,
  // read them and send them out the socket if it's open:
  while (Serial.available() > 0) {
    char inChar = Serial.read();
    if (client.connected()) {
      client.print(inChar);
    }
  }

  // if the server's disconnected, stop the client:
  if (!client.connected()) {
    Serial.println();
    Serial.println("disconnecting.");
    client.stop();
    // do nothing:
    while (true);
  }
}
[Get Code] 更多
- Arduino Ethernet Shield – 产品描述。
- Getting started with the Ethernet Shield – 在几分钟内启动所有东西。
- Ethernet library – 以太网库的参考手册
- AdvancedChatServer - 一个服务器,用来发送所有传入的信息到所有连接的客户端(除了那个发送信息的客户端)。
- ChatServer - 一个简单的服务器,用来发送所有传入的信息到所有连接的客户端。
- WebClient – 查询网络,并通过串口监视器得到答案
- WebClientRepeating - 如何用以太网shield重复HTTP请求。
- WebServer - 一个简单的Web服务器,用来显示模拟输入的值。
- DhcpAddressPrinter – 获取DHCP地址,并打印出到串口监视器。
- DhcpChatServer – 连接到一个telnet服务器,并打印所有收到的信息到串口监视器上。用DHCP。
- TelnetClient - 连接到一个telnet服务器,并打印所有收到的信息到串口监视器上。
- BarometricPressureWebServer – 用SPI从压力传感器读取的Post数据。
- UDPSendReceiveString - 通过UDP协议(通用数据包)发送和接收文本字符串。
- UdpNtpClient - 查询一个网络时间协议(NTP)服务器,并通过串口服务器监视器获取这个信息。
纠错,疑问,交流: 请进入讨论区或 请点击进入页面,扫码加入微信群或Q群进行交流
获取最新文章: 扫一扫加入“创客智造”公众号