


Arduino库教程-Ethernet-UDP Send Receive String
Sending and Receiving String via UDP
- 在这个例子中,你将用Ethernet Shield和Arduino通过UDP协议(通用数据包)来发送和接收文本字符串。您将需要另一个设备来发送和接收。运行此示例,Processing程序(在代码末尾)将发送和接收你的Arduino。
硬件要求
- Arduino 或者 Genuino 开发板
- Arduino Ethernet Shield
电路
以太网shield可以让你通过SPI总线连接一个 Wiznet 以太网控制器到Arduino或者genuino开发板板。它使用SPI总线连接的引脚pin 10,11,12,和13,到Wiznet。以太网shield后来的模块也有一个SD卡在板上。数字引脚 pin 4 用来控制SD卡上的从选择引脚(slave select pin)。
shield应该连接到一个有以太网电缆的网络。您将需要更改程序中的网络设置来对应于您的网络。
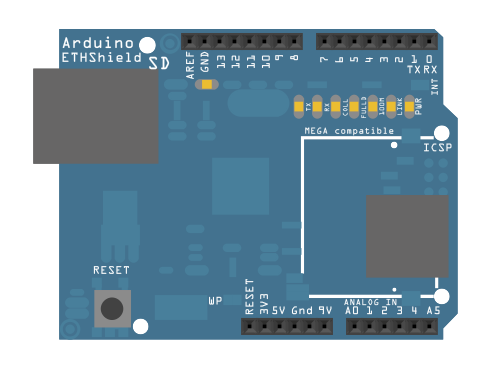
图由 Fritzing 软件绘制
在上面的图片里,Arduino或genuino开发板会堆叠在以太网shield下面。
原理图

样例代码
/*
 UDPSendReceiveString:
 This sketch receives UDP message strings, prints them to the serial port
 and sends an "acknowledge" string back to the sender

 A Processing sketch is included at the end of file that can be used to send
 and received messages for testing with a computer.

 created 21 Aug 2010
 by Michael Margolis

 This code is in the public domain.
 */


#include <SPI.h>         // needed for Arduino versions later than 0018
#include <Ethernet.h>
#include <EthernetUdp.h>         // UDP library from: bjoern@cs.stanford.edu 12/30/2008


// Enter a MAC address and IP address for your controller below.
// The IP address will be dependent on your local network:
byte mac[] = {
  0xDE, 0xAD, 0xBE, 0xEF, 0xFE, 0xED
};
IPAddress ip(192, 168, 1, 177);

unsigned int localPort = 8888;      // local port to listen on

// buffers for receiving and sending data
char packetBuffer[UDP_TX_PACKET_MAX_SIZE];  //buffer to hold incoming packet,
char  ReplyBuffer[] = "acknowledged";       // a string to send back

// An EthernetUDP instance to let us send and receive packets over UDP
EthernetUDP Udp;

void setup() {
  // start the Ethernet and UDP:
  Ethernet.begin(mac, ip);
  Udp.begin(localPort);

  Serial.begin(9600);
}

void loop() {
  // if there's data available, read a packet
  int packetSize = Udp.parsePacket();
  if (packetSize) {
    Serial.print("Received packet of size ");
    Serial.println(packetSize);
    Serial.print("From ");
    IPAddress remote = Udp.remoteIP();
    for (int i = 0; i < 4; i++) {
      Serial.print(remote[i], DEC);
      if (i < 3) {
        Serial.print(".");
      }
    }
    Serial.print(", port ");
    Serial.println(Udp.remotePort());

    // read the packet into packetBufffer
    Udp.read(packetBuffer, UDP_TX_PACKET_MAX_SIZE);
    Serial.println("Contents:");
    Serial.println(packetBuffer);

    // send a reply to the IP address and port that sent us the packet we received
    Udp.beginPacket(Udp.remoteIP(), Udp.remotePort());
    Udp.write(ReplyBuffer);
    Udp.endPacket();
  }
  delay(10);
}


/*
  Processing sketch to run with this example
 =====================================================

 // Processing UDP example to send and receive string data from Arduino
 // press any key to send the "Hello Arduino" message


 import hypermedia.net.*;

 UDP udp;  // define the UDP object


 void setup() {
 udp = new UDP( this, 6000 );  // create a new datagram connection on port 6000
 //udp.log( true );         // <-- printout the connection activity
 udp.listen( true );           // and wait for incoming message
 }

 void draw()
 {
 }

 void keyPressed() {
 String ip       = "192.168.1.177"; // the remote IP address
 int port        = 8888;        // the destination port

 udp.send("Hello World", ip, port );   // the message to send

 }

 void receive( byte[] data ) {          // <-- default handler
 //void receive( byte[] data, String ip, int port ) {   // <-- extended handler

 for(int i=0; i < data.length; i++)
 print(char(data[i]));
 println();
 }
 */
Processing 代码
- 从上面的样例代码里复制Processing程序。当你在Ptocessing程序窗口输入任何字母时,它会通过UDP发送一个字符串到Arduino上。
更多
- Arduino Ethernet Shield – 产品描述。
- Getting started with the Ethernet Shield – 在几分钟内启动所有东西。
- Ethernet library – 以太网库的参考手册
- AdvancedChatServer - 一个服务器,用来发送所有传入的信息到所有连接的客户端(除了那个发送信息的客户端)。
- ChatServer - 一个简单的服务器,用来发送所有传入的信息到所有连接的客户端。
- WebClient – 查询网络,并通过串口监视器得到答案
- WebClientRepeating - 如何用以太网shield重复HTTP请求。
- WebServer - 一个简单的Web服务器,用来显示模拟输入的值。
- DhcpAddressPrinter – 获取DHCP地址,并打印出到串口监视器。
- DhcpChatServer – 连接到一个telnet服务器,并打印所有收到的信息到串口监视器上。用DHCP。
- TelnetClient - 连接到一个telnet服务器,并打印所有收到的信息到串口监视器上。
- BarometricPressureWebServer – 用SPI从压力传感器读取的Post数据。
- UDPSendReceiveString - 通过UDP协议(通用数据包)发送和接收文本字符串。
- UdpNtpClient - 查询一个网络时间协议(NTP)服务器,并通过串口服务器监视器获取这个信息。
获取最新文章: 扫一扫右上角的二维码加入“创客智造”公众号