


Turtlebot4入门教程-演示-创建节点(C++)
纠错,疑问,交流: 请进入讨论区或 请点击进入页面,扫码加入微信群或Q群进行交流
获取最新文章: 扫一扫加入“创客智造”公众号
欢迎加入我们的turtlebot4交流群,微信扫描右侧二维码立即进群交流
Turtlebot4入门教程-演示-创建节点(C++)
说明:
- 本教程将介绍创建 ROS2 包和用 C++ 编写 ROS2 节点的步骤。
- 有关 Python 示例,请单击此处。
- 这些步骤与 ROS2 教程类似,但侧重于与 TurtleBot 4 的交互。源代码,请单击此处。
- 您可以在 TurtleBot 4 的 Raspberry Pi 或 PC 上学习本教程。
相关设备:
- Turtlebot4机器人套件:采购地址
步骤:
-
创建工作区
-
如果您还没有工作区,请打开一个终端并在您选择的目录中创建一个:
mkdir ~/turtlebot4_ws/src -p- 创建包和节点
- 您将需要创建一个 ROS2 包来保存您的文件。
- 在本教程中,我们将创建一个名为 turtlebot4_cpp_tutorials 的包,其中包含一个名为 turtlebot4_first_cpp_node 的节点。
source /opt/ros/galactic/setup.bash
cd ~/turtlebot4_ws/src
ros2 pkg create --build-type ament_cmake --node-name turtlebot4_first_cpp_node turtlebot4_cpp_tutorials- 这将创建一个 turtlebot4_cpp_tutorials 文件夹并使用基本的“Hello World”节点以及 ROS2 C++ 包所需的 CMakeLists.txt 和 package.xml 文件填充它。
写你的节点
- 下一步是开始编码。 对于本教程,我们的目标是使用 Create® 3 界面按钮 1 更改 Create® 3 灯环的颜色。
- 在您喜欢的文本编辑器中打开位于
~/turtlebot4_ws/src/turtlebot4_cpp_tutorials/src/turtlebot4_first_cpp_node.cpp的“Hello World”.cpp 文件。
添加您的依赖项
-
对于本教程,我们将需要使用 rclcpp 和 irobot_create_msgs 包。 rclcpp 包允许我们创建 ROS2 节点,并让我们可以完全访问 C++ 中的所有基本 ROS2 功能。 irobot_create_msgs 包使我们能够访问 Create® 3 用于读取按钮按下和控制灯环的自定义消息。
-
在您的 CMakeLists.txt 文件中,在 find_package(ament_cmake REQUIRED) 下添加这些行:
find_package(rclcpp REQUIRED)
find_package(irobot_create_msgs REQUIRED)- 并在 add_executable(turtlebot4_first_cpp_node src/turtlebot4_first_cpp_node.cpp) 下添加这一行:
ament_target_dependencies(turtlebot4_first_cpp_node rclcpp irobot_create_msgs)- 在 package.xml 中,在 <buildtool_depend>ament_cmake</buildtool_depend> 下添加这些行:
<depend>rclcpp</depend>
<depend>irobot_create_msgs</depend>- 最后,在您的节点 .cpp 文件中,您需要包含以下头文件:
#include <chrono>
#include <functional>
#include <memory>
#include <string>

#include "rclcpp/rclcpp.hpp"

#include "irobot_create_msgs/msg/interface_buttons.hpp"
#include "irobot_create_msgs/msg/lightring_leds.hpp"
创建一个类
- 现在已经设置了依赖项,我们可以创建一个继承自 rclcpp::Node 类的类。
- 我们将这个类称为 TurtleBot4FirstNode。
class TurtleBot4FirstNode : public rclcpp::Node
{
public:
  TurtleBot4FirstNode()
  : Node("turtlebot4_first_cpp_node")
  {}
};-
请注意,我们的类调用 Node 构造函数并将节点的名称turtlebot4_first_cpp_node 传递给它。
-
我们现在可以在主函数中创建我们的节点并旋转它。 由于我们的节点是空的,节点将被创建但它不会做任何事情。
int main(int argc, char * argv[])
{
  rclcpp::init(argc, argv);
  rclcpp::spin(std::make_shared<TurtleBot4FirstNode>());
  rclcpp::shutdown();
  return 0;
}
订阅 Create® 3 界面按钮
-
我们的下一步是订阅 Create® 3 界面按钮主题以接收按钮按下。
-
我们需要为订阅创建一个 rclcpp::Subscription 以及一个回调函数。
-
每次我们收到关于界面按钮主题的消息时,都会调用回调函数。
class TurtleBot4FirstNode : public rclcpp::Node
{
public:
  TurtleBot4FirstNode()
  : Node("turtlebot4_first_cpp_node")
  {
    // Subscribe to the /interface_buttons topic
    interface_buttons_subscriber_ =
      this->create_subscription<irobot_create_msgs::msg::InterfaceButtons>(
      "/interface_buttons",
      rclcpp::SensorDataQoS(),
      std::bind(&TurtleBot4FirstNode::interface_buttons_callback, this, std::placeholders::_1));
  }

private:
  // Interface buttons subscription callback
  void interface_buttons_callback(
    const irobot_create_msgs::msg::InterfaceButtons::SharedPtr create3_buttons_msg)
  {}

  // Interface Button Subscriber
  rclcpp::Subscription<irobot_create_msgs::msg::InterfaceButtons>::SharedPtr interface_buttons_subscriber_;
};-
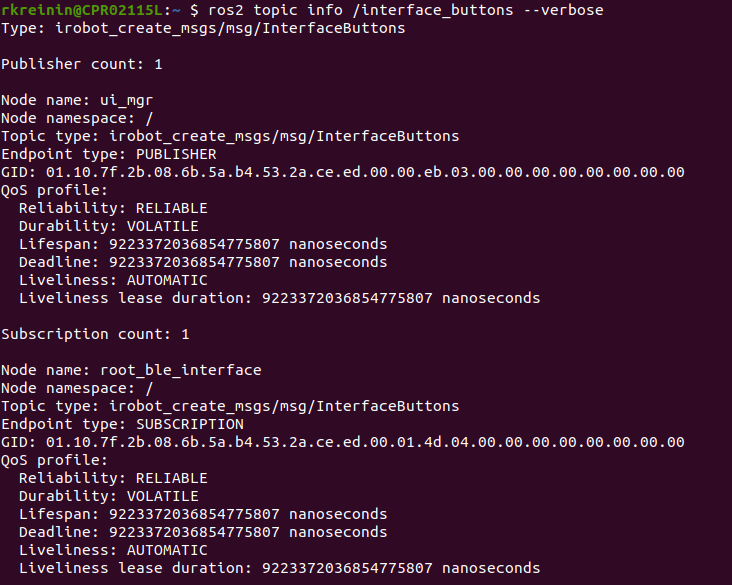
注意 interface_buttons_subscriber_ 使用 InterfaceButtons 消息类型,服务质量是 rclcpp::SensorDataQoS()。 这些参数必须与主题匹配,否则订阅会失败。 如果您不确定主题使用的是什么消息类型或 QoS,您可以使用 ROS2 CLI 查找此信息。
-
调用 ros2 topic info /
--verbose 以获取完整的详细信息。
Test Create® 3 Button 1
- 现在我们已经订阅了,让我们通过在每次按下按钮 1 时打印一条消息来测试我们的节点。
- 编辑界面按钮回调函数,如下所示:
// Interface buttons subscription callback
  void interface_buttons_callback(
    const irobot_create_msgs::msg::InterfaceButtons::SharedPtr create3_buttons_msg)
  {
    // Button 1 is pressed
    if (create3_buttons_msg->button_1.is_pressed) {
      RCLCPP_INFO(this->get_logger(), "Button 1 Pressed!");
    }
}-
现在,每次我们收到关于 /interface_buttons 主题的消息时,我们都会检查按钮 1 是否被按下,如果是,则节点将打印一条消息。
-
为了测试这一点,我们需要使用 colcon 构建我们的包:
cd ~/turtlebot4_ws
colcon build --packages-select turtlebot4_cpp_tutorials
source install/local_setup.bash-
--packages-select标志允许您输入要构建的任意数量的包,以防您不想在工作区中构建所有包。 -
现在,尝试运行节点:
ros2 run turtlebot4_cpp_tutorials turtlebot4_first_cpp_node-
当你运行它时,在你按下 TurtleBot 4 上的按钮 1 之前什么都不会发生。
-
按下按钮,您应该会在终端中看到以下消息:
[INFO] [1652379086.090977658] [turtlebot4_first_cpp_node]: Button 1 Pressed!- 像这样打印消息是调试代码的好方法。
创建灯光发布者
- 现在我们可以接收到按钮按下,让我们创建一个 lightring 发布者。
class TurtleBot4FirstNode : public rclcpp::Node
{
public:
  TurtleBot4FirstNode()
  : Node("turtlebot4_first_cpp_node")
  {
    // Subscribe to the /interface_buttons topic
    interface_buttons_subscriber_ =
      this->create_subscription<irobot_create_msgs::msg::InterfaceButtons>(
      "/interface_buttons",
      rclcpp::SensorDataQoS(),
      std::bind(&TurtleBot4FirstNode::interface_buttons_callback, this, std::placeholders::_1));

    // Create a publisher for the /cmd_lightring topic
    lightring_publisher_ = this->create_publisher<irobot_create_msgs::msg::LightringLeds>(
      "/cmd_lightring",
      rclcpp::SensorDataQoS());
  }

private:
  // Interface buttons subscription callback
  void interface_buttons_callback(
    const irobot_create_msgs::msg::InterfaceButtons::SharedPtr create3_buttons_msg)
  {
    // Button 1 is pressed
    if (create3_buttons_msg->button_1.is_pressed) {
      RCLCPP_INFO(this->get_logger(), "Button 1 Pressed!");
    }
  }

  // Interface Button Subscriber
  rclcpp::Subscription<irobot_create_msgs::msg::InterfaceButtons>::SharedPtr interface_buttons_subscriber_;
  // Lightring Publisher
  rclcpp::Publisher<irobot_create_msgs::msg::LightringLeds>::SharedPtr lightring_publisher_;
};- Lightring 发布者使用 LightringLeds 消息类型。
- 接下来,让我们创建一个将填充 LightringLeds 消息并发布它的函数。
- 在您的 interface_buttons_callback 函数下方添加此代码:
// Perform this function when Button 1 is pressed.
  void button_1_function()
  {
    // Create a ROS2 message
    auto lightring_msg = irobot_create_msgs::msg::LightringLeds();
    // Stamp the message with the current time
    lightring_msg.header.stamp = this->get_clock()->now();

    // Override system lights
    lightring_msg.override_system = true;

    // LED 0
    lightring_msg.leds[0].red = 255;
    lightring_msg.leds[0].blue = 0;
    lightring_msg.leds[0].green = 0;

    // LED 1
    lightring_msg.leds[1].red = 0;
    lightring_msg.leds[1].blue = 255;
    lightring_msg.leds[1].green = 0;

    // LED 2
    lightring_msg.leds[2].red = 0;
    lightring_msg.leds[2].blue = 0;
    lightring_msg.leds[2].green = 255;

    // LED 3
    lightring_msg.leds[3].red = 255;
    lightring_msg.leds[3].blue = 255;
    lightring_msg.leds[3].green = 0;

    // LED 4
    lightring_msg.leds[4].red = 255;
    lightring_msg.leds[4].blue = 0;
    lightring_msg.leds[4].green = 255;

    // LED 5
    lightring_msg.leds[5].red = 0;
    lightring_msg.leds[5].blue = 255;
    lightring_msg.leds[5].green = 255;
    // Publish the message
    lightring_publisher_->publish(lightring_msg);
}- 此函数创建一个 LightringLeds 消息并填充参数。
- 我们首先用当前时间标记消息:
lightring_msg.header.stamp = this->get_clock()->now();- 然后我们将 override_system 参数设置为 true,以便我们的命令覆盖 Create® 3 发送到 lightring 的任何命令。
lightring_msg.override_system = true;- 接下来,我们用我们想要的任何颜色填充 LED 阵列中的 6 个 LED。
// LED 0
lightring_msg.leds[0].red = 255;
lightring_msg.leds[0].blue = 0;
lightring_msg.leds[0].green = 0;

// LED 1
lightring_msg.leds[1].red = 0;
lightring_msg.leds[1].blue = 255;
lightring_msg.leds[1].green = 0;

// LED 2
lightring_msg.leds[2].red = 0;
lightring_msg.leds[2].blue = 0;
lightring_msg.leds[2].green = 255;

// LED 3
lightring_msg.leds[3].red = 255;
lightring_msg.leds[3].blue = 255;
lightring_msg.leds[3].green = 0;

// LED 4
lightring_msg.leds[4].red = 255;
lightring_msg.leds[4].blue = 0;
lightring_msg.leds[4].green = 255;

// LED 5
lightring_msg.leds[5].red = 0;
lightring_msg.leds[5].blue = 255;
lightring_msg.leds[5].green = 255;- 每个 RGB 值可以设置在 0 到 255 之间。您可以查找任何颜色的 RGB 值并在此处进行设置。
- 最后,我们发布消息。
lightring_publisher_->publish(lightring_msg);按下按钮发布 lightring 命令
- 现在我们可以将我们的界面按钮订阅连接到我们的 lightring 发布者。
- 只需在 interface_buttons_callback 中调用 button_1_function。
// Interface buttons subscription callback
  void interface_buttons_callback(
    const irobot_create_msgs::msg::InterfaceButtons::SharedPtr create3_buttons_msg)
  {
    // Button 1 is pressed
    if (create3_buttons_msg->button_1.is_pressed) {
      RCLCPP_INFO(this->get_logger(), "Button 1 Pressed!");

      button_1_function();
    }
}- 通过像以前一样构建包并运行节点来测试它。
- 按下按钮 1,lightring 灯应如下所示:

切换灯环
- 您会注意到,一旦您设置了 lightrings LED,它们将永远保持这种状态。 让按钮在每次按下时打开或关闭灯。
- 添加一个布尔值来跟踪灯光状态:
bool lights_on_;- 在类构造函数中初始化布尔值:
TurtleBot4FirstNode()
: Node("turtlebot4_first_cpp_node"), lights_on_(false)- 并修改 button_1_function 来切换灯光:
void button_1_function()
  {
    // Create a ROS2 message
    auto lightring_msg = irobot_create_msgs::msg::LightringLeds();
    // Stamp the message with the current time
    lightring_msg.header.stamp = this->get_clock()->now();

    // Lights are currently off
    if (!lights_on_) {
      // Override system lights
      lightring_msg.override_system = true;

      // LED 0
      lightring_msg.leds[0].red = 255;
      lightring_msg.leds[0].blue = 0;
      lightring_msg.leds[0].green = 0;

      // LED 1
      lightring_msg.leds[1].red = 0;
      lightring_msg.leds[1].blue = 255;
      lightring_msg.leds[1].green = 0;

      // LED 2
      lightring_msg.leds[2].red = 0;
      lightring_msg.leds[2].blue = 0;
      lightring_msg.leds[2].green = 255;

      // LED 3
      lightring_msg.leds[3].red = 255;
      lightring_msg.leds[3].blue = 255;
      lightring_msg.leds[3].green = 0;

      // LED 4
      lightring_msg.leds[4].red = 255;
      lightring_msg.leds[4].blue = 0;
      lightring_msg.leds[4].green = 255;

      // LED 5
      lightring_msg.leds[5].red = 0;
      lightring_msg.leds[5].blue = 255;
      lightring_msg.leds[5].green = 255;
    }
    // Lights are currently on
    else {
      // Disable system override. The system will take back control of the lightring.
      lightring_msg.override_system = false;
    }
    // Publish the message
    lightring_publisher_->publish(lightring_msg);
    // Toggle the lights on status
    lights_on_ = !lights_on_;
}- 现在,如果我们再次按下按钮 1,Create® 3 将重新获得对光环的控制。
你的第一个 C++ 节点
- 你已经完成了你的第一个 C++ 节点的编写! 最终的 .cpp 文件应如下所示:
#include <chrono>
#include <functional>
#include <memory>
#include <string>

#include "rclcpp/rclcpp.hpp"

#include "irobot_create_msgs/msg/interface_buttons.hpp"
#include "irobot_create_msgs/msg/lightring_leds.hpp"

class TurtleBot4FirstNode : public rclcpp::Node
{
public:
  TurtleBot4FirstNode()
  : Node("turtlebot4_first_cpp_node"), lights_on_(false)
  {
    // Subscribe to the /interface_buttons topic
    interface_buttons_subscriber_ =
      this->create_subscription<irobot_create_msgs::msg::InterfaceButtons>(
      "/interface_buttons",
      rclcpp::SensorDataQoS(),
      std::bind(&TurtleBot4FirstNode::interface_buttons_callback, this, std::placeholders::_1));

    // Create a publisher for the /cmd_lightring topic
    lightring_publisher_ = this->create_publisher<irobot_create_msgs::msg::LightringLeds>(
      "/cmd_lightring",
      rclcpp::SensorDataQoS());
  }

private:
  // Interface buttons subscription callback
  void interface_buttons_callback(
    const irobot_create_msgs::msg::InterfaceButtons::SharedPtr create3_buttons_msg)
  {
    // Button 1 is pressed
    if (create3_buttons_msg->button_1.is_pressed) {
      RCLCPP_INFO(this->get_logger(), "Button 1 Pressed!");

      button_1_function();
    }
  }

  // Perform a function when Button 1 is pressed.
  void button_1_function()
  {
    // Create a ROS2 message
    auto lightring_msg = irobot_create_msgs::msg::LightringLeds();
    // Stamp the message with the current time
    lightring_msg.header.stamp = this->get_clock()->now();

    // Lights are currently off
    if (!lights_on_) {
      // Override system lights
      lightring_msg.override_system = true;

      // LED 0
      lightring_msg.leds[0].red = 255;
      lightring_msg.leds[0].blue = 0;
      lightring_msg.leds[0].green = 0;

      // LED 1
      lightring_msg.leds[1].red = 0;
      lightring_msg.leds[1].blue = 255;
      lightring_msg.leds[1].green = 0;

      // LED 2
      lightring_msg.leds[2].red = 0;
      lightring_msg.leds[2].blue = 0;
      lightring_msg.leds[2].green = 255;

      // LED 3
      lightring_msg.leds[3].red = 255;
      lightring_msg.leds[3].blue = 255;
      lightring_msg.leds[3].green = 0;

      // LED 4
      lightring_msg.leds[4].red = 255;
      lightring_msg.leds[4].blue = 0;
      lightring_msg.leds[4].green = 255;

      // LED 5
      lightring_msg.leds[5].red = 0;
      lightring_msg.leds[5].blue = 255;
      lightring_msg.leds[5].green = 255;
    }
    // Lights are currently on
    else {
      // Disable system override. The system will take back control of the lightring.
      lightring_msg.override_system = false;
    }
    // Publish the message
    lightring_publisher_->publish(lightring_msg);
    // Toggle the lights on status
    lights_on_ = !lights_on_;
  }

  // Interface Button Subscriber
  rclcpp::Subscription<irobot_create_msgs::msg::InterfaceButtons>::SharedPtr
    interface_buttons_subscriber_;
  // Lightring Publisher
  rclcpp::Publisher<irobot_create_msgs::msg::LightringLeds>::SharedPtr lightring_publisher_;
  // Lights on status
  bool lights_on_;
};

int main(int argc, char * argv[])
{
  rclcpp::init(argc, argv);
  rclcpp::spin(std::make_shared<TurtleBot4FirstNode>());
  rclcpp::shutdown();
  return 0;
}- 在运行节点之前不要忘记再次构建包。
纠错,疑问,交流: 请进入讨论区或 请点击进入页面,扫码加入微信群或Q群进行交流
获取最新文章: 扫一扫加入“创客智造”公众号
欢迎加入我们的turtlebot4交流群,微信扫描右侧二维码立即进群交流